In This Article
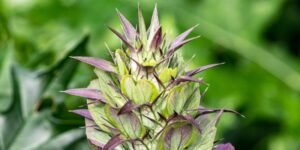
Ah, epimediums. Those delightful perennials have, over the years, won me over in my own shady garden. If you’ve ever strolled through a woodland garden, and noticed the ground beneath the trees blanketed in delicate, heart-shaped leaves, you’ve likely come across an epimedium. Epimediums, sometimes dubbed barrenwort or bishop’s hat due to their unusual blooms that evoke delicate fairy wings or even clerical headgear, are a favorite of mine. They’re perfect for those difficult, shady areas in the garden. They’re tough as nails once established, spreading gently to form a lush ground cover that suppresses weeds and adds a touch of whimsy with their spring blooms in shades of pink, yellow, or white. Cultivating epimediums has, in my experience, completely changed the way I view those neglected, dim corners of the garden. These plants have a remarkable ability to turn them into lively, easy-care showcases. Plus, they’re a magnet for pollinators and offer visual appeal throughout the seasons. For those just starting to explore the world of shade gardening, or even the most experienced gardeners hoping to add something new, epimediums present a winning combination of aesthetic appeal and hardiness, requiring surprisingly little upkeep.
To give you a quick overview before we dive into the planting details, here’s a handy table summarizing the key traits of the epimedium plant based on what I’ve observed in my gardens over the decades:
Field | Details |
Botanical Name | Epimedium spp. (various species like E. grandiflorum or E. versicolor) |
Common Name | Barrenwort, Bishop’s Hat, Fairy Wings |
Plant Type | Herbaceous Perennial |
Mature Height & Spread | Height: 6-18 inches; Spread: 12-36 inches, depending on variety |
Light Requirement | Part shade to full shade; tolerates dappled light under trees |
Soil Type | Well-drained, humus-rich, slightly acidic to neutral (pH 5.5-7.0) |
Bloom Season | Early to mid-spring |
Water Needs | Moderate; prefers consistent moisture but drought-tolerant once established |
Maintenance Level | Low; minimal pruning and feeding required
|
How To Plant Epimediums
Planting epimediums is hardly complicated; it’s more akin to a leisurely garden project, particularly if you’ve got a bare patch yearning for some greenery. After more than a decade and a half of cultivating these lovely plants, I’ve developed a method that guarantees their success from the get-go. Let’s go through the process, combining the initial planting with advice on how to keep your epimediums flourishing and expanding.
Step 1: Choose the Right Garden Location
To thrive, epimediums need a location that replicates their native woodland environment.
Epimediums, I’ve discovered, thrive in my gardens when planted in dappled shade. They seem to prefer spots beneath deciduous trees, where they catch the soft light of morning but are protected from the intensity of the afternoon sun.
Avoid full sun, as it can scorch their delicate leaves – I’ve learned that the hard way with a few crispy experiments early on. If your yard’s soil is heavy with clay or prone to waterlogging, it’s best to avoid epimediums. These plants simply won’t thrive in soggy conditions, and their roots will readily succumb to rot.
Instead, opt for sloped areas or raised beds in partial shade. Don’t forget about companions, either. Combining an epimedium with hostas or ferns can give your shade garden a more natural, layered appearance, which really elevates the whole aesthetic.
After surveying the area, outline the space to anticipate how the epimediums will expand, creating a gentle ground cover that naturally inhibits weed growth.
Step 2: Prepare Loose, Organic-Rich Soil
The groundwork, quite literally, is where it all begins with epimedium cultivation. These plants thrive in soil that’s both loose and rich, much like the forest floor. First, I use a garden fork to loosen the top eight to twelve inches of soil. There’s no need for heavy tilling; a gentle aeration is all that’s required, allowing me to avoid disrupting the soil’s natural structure. Incorporate generous amounts of organic matter, such as composted leaves or well-rotted manure. From what I’ve seen, this significantly improves drainage and fertility, which in turn aids epimediums in developing robust root systems. If your soil is on the heavy side, add some coarse sand or pine bark to prevent compaction. If possible, check the pH. Epimediums thrive in slightly acidic soil, ideally with a pH between 6.0 and 6.5. They will also survive in neutral environments, as long as the soil isn’t alkaline. I’ve had great success with epimediums in amended beds; they really thrive. Skipping that preparation, however, resulted in a less-than-stellar showing. Good soil preparation is key; it pays off down the line with your epimedium.
Step 3: Select Healthy Epimedium Plant Divisions
When it comes to sourcing epimediums, I swear by starting with healthy divisions rather than seeds, which can be finicky and slow. Visit a well-regarded nursery and seek out healthy epimedium plant clusters. Look for those with lush, green leaves that show no signs of pests. Steer clear of any plants that appear droopy or have leaves that are turning yellow; these could indicate problems with the roots. During the ideal planting seasons of spring and fall, you’re likely to encounter divisions that are prepared for immediate use. Every few years, I’ve split my well-established epimediums to create new plants. I carefully separate the rhizomes, using my hands or a sharp knife, making sure each section has a few buds and some roots to get them started. Select varieties that thrive in specific climate. If you’re in a cooler region, consider robust options such as Epimedium grandiflorum. Conversely, those in milder areas might prefer the evergreen epimediums. Look for any indications of illness, such as the telltale powdery mildew, and isolate any new arrivals if necessary. This thoughtful choice has spared me a lot of trouble and guaranteed my epimediums spread as they should.
Step 4: Planting Epimediums at the Correct Depth
Now for the fun part: getting those epimediums in the ground. Make the holes roughly double the width of the root ball, but keep the depth the same. The epimedium’s crown needs to be level with the soil’s surface; if it’s planted too deeply, it risks rotting. I’ve made that mistake before, and it’s a quick way to lose a promising start. Space them out, twelve to eighteen inches apart, to give them room to spread. In my own beds, this results in a thick, lush mat after a few growing seasons. Carefully position the division in the hole, spreading the roots outwards. Next, refill the hole with your soil mixture, applying gentle pressure to remove any air pockets. If your epimediums are in pots and the roots are tightly wound, give them a gentle tug. Water lightly you go to settle the soil. This method of planting encourages the rhizomes to spread horizontally, allowing a single epimedium plant to develop into a large colony.
Step 5: Watering After Planting
Right after planting, give your epimediums a good soak to help them settle in. I prefer a light spray from the hose or a watering can, applying water slowly to avoid disturbing the surface. The objective is to apply approximately one inch of water, ensuring it penetrates the root zone. During the initial weeks, maintain a consistently moist soil environment, avoiding waterlogging. Although epimediums show some drought resistance after they’ve been established, newly planted ones need more careful attention. Mulching is a good idea, I’ve found. But let’s save that for later. Watch for any signs of wilting, and then change your approach as needed. When the rain falls, you can cut back on the watering schedule. During periods of dry weather, your plants will require some assistance. Once the epimedium roots are settled in, you can start to cut back on the watering. Offer them a drink during prolonged periods without rain to maintain their appearance.
Step 6: Mulching to Retain Moisture
Mulch is a gardener’s best friend for epimediums, locking in moisture and mimicking their leafy forest floor origins. Following irrigation, apply a 2-3 inch layer of organic mulch, such as shredded bark or leaf mold, around the plant’s base. Ensure the mulch is kept a few inches away from the stems to mitigate the risk of rot. In my shady gardens, this approach does more than just save water. It also keeps weeds at bay and, as it decomposes, enriches the soil. Refresh the mulch annually in spring; I’ve noticed that well-mulched epimediums stay healthier through hot summers and cold winters. Choose natural materials over plastic; epimediums flourish when given a slow, steady supply of nutrients. This particular step has been a game-changer for me, allowing for a more hands-off approach. It significantly cuts down on the need to constantly water and weed around each epimedium.
Step 7: Feeding and Soil Enrichment
Epimediums aren’t particularly demanding when it comes to nutrients, but a little help can make a difference. I give them a boost in early spring, before the new growth starts. I either apply a balanced, slow-release fertilizer or top-dress with compost around the plants. It’s best to avoid fertilizers high in nitrogen; they can lead to more foliage than flowers. A diluted 10-10-10 mix works well. Every few years, I add more organic matter to the soil to naturally improve its quality. If you notice any signs of nutrient deficiency, such as pale leaves, a gentle feed can help. From what I’ve seen, too much fertilizer results in weak, floppy growth, so it’s better to err on the side of caution with these tough epimediums. This approach also keeps the soil teeming with beneficial microbes, which helps your epimediums thrive for the long haul.
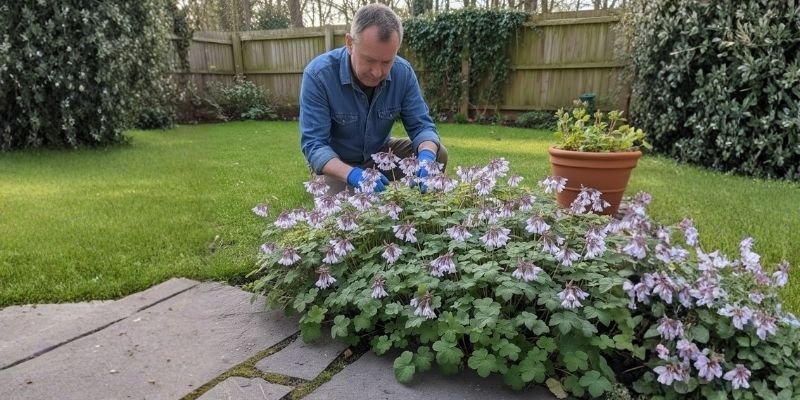
Step 8: Pruning Old Foliage and Seasonal Care
As the year turns, a little tidying up keeps epimediums looking their best. Late winter or early spring is the time to act, before the new growth starts. I simply cut back the old, ragged leaves to ground level with clean shears. This simple step encourages fresh growth and helps keep diseases at bay. For the evergreen types, just snip away any damaged leaves.
When they’re in bloom, enjoy the flowers. You can deadhead them if you want, but it’s not strictly necessary. In the fall, let the leaves yellow naturally; it adds some winter interest. Seasonal care also means dividing any clumps that have gotten too crowded, about every three to five years, to keep them healthy. I usually do this after they’ve flowered, or in the autumn, and replant the divisions right away. This approach has kept my epimediums thriving, transforming what could be a messy look into neat, flourishing patches.

Step 9: Long-Term Epimedium Plant Maintenance
Epimediums, given time, offer a lasting display with very little fuss. Keep an eye out for pests, such as slugs, especially during wet springs – I usually just pick them off or set up organic barriers. Disease isn’t a frequent problem, though good air circulation can help ward it off. As they spread, thin them out if things get tight. A light layer of mulch can offer some protection in particularly harsh winters. I’ve watched epimediums recover from neglect, but regular checks are what keep them looking their best in the shade garden. Pairing them with bulbs like snowdrops brings early spring interest. Ultimately, long-term care is all about watching and adjusting as your epimedium settles in, and it’ll give you easy ground cover for many years.
Epimediums are a gardener’s best friend when it comes to shady spots. They’re simple to establish, demand minimal upkeep, and can turn a dull, dark area into a captivating scene with their leaves and flowers. If you’re struggling with those hard-to-manage, low-light areas, consider adding an epimedium to your garden. You’ll likely be surprised you didn’t use them sooner.
FAQs –
1. What makes epimediums a good choice for beginners in shade gardening?
Epimediums are a godsend for novice gardeners; they’re surprisingly adaptable, thriving even when light levels fluctuate, and they don’t require a perfect start. Having planted them in less-than-ideal locations over the years, I’ve watched them settle in and flourish with minimal fuss, which is great for building confidence. They also spread naturally, filling in empty spaces, which means less replanting. Plus, once established, they’re remarkably drought-resistant, freeing you from a rigid watering routine. A little soil preparation is all they need, and they’ll repay you with delicate spring blooms and year-round greenery in more temperate areas.
2. Can epimediums grow in containers, and how do I care for them there?
Epimediums do quite well in pots, particularly on patios or balconies where they get some shade. I’ve had success growing them in sizable containers, using a blend of potting soil and compost to ensure good drainage. I usually space out several divisions, which gives a sort of mini ground cover look. Because pots dry out more quickly than garden beds, you’ll need to water them more often. Just be sure to let the top inch of soil dry out between waterings to prevent root rot. If you live somewhere that gets freezing temperatures, it’s best to bring them inside for the winter. A light fertilizing in the spring is all they need. This approach has been great for me, letting me try out different varieties without taking up precious garden space.
3. How do I propagate epimediums without buying new plants?
Propagation of epimediums is simple and budget-friendly. I usually dig up a sizable clump every couple of years, either in early spring or autumn. I carefully divide the rhizomes, ensuring each section has at least two growth buds. These divisions are then replanted right away in soil I’ve prepared, and I give them a good watering to help them settle in. This approach has allowed my collection to grow significantly, and it’s always nice to share the extras with friends. It’s worth remembering that patience is important; the new plants might not flower in their first year, but the process actually helps the parent plants by alleviating overcrowding.
4. What companion plants pair well with epimediums in a woodland garden?
Epimediums really come into their own when planted with other shade-tolerant plants that enhance their appearance and blooming period. In my own garden, I’ve found that hellebores, with their winter flowers, make a great companion. Bleeding hearts bring springtime color, and astilbes offer a feathery contrast. Maidenhair ferns, for instance, introduce a lovely softness, while hostas contribute their bold foliage. This layered approach creates a sense of depth, with the epimediums acting as a low ground cover, and taller perennials emerging above. It’s best to steer clear of plants that spread aggressively, as they might outcompete the epimediums. Instead, choose plants that have similar moisture requirements to create a balanced, low-maintenance environment.
5. Are epimediums deer-resistant, and how can I protect them if needed?
Epimediums are usually left alone by deer, thanks to their leathery foliage and the fact that they don’t smell like much. In my garden, which is out in the sticks, they haven’t been bothered much, unlike some of the more delicate things. If deer are a real problem, a light mist of repellent or some netting while they’re getting started can help. Planting them near herbs with a strong scent, like lavender, can also keep the deer away. All in all, their hardiness makes them a good bet in places where wildlife is a concern, and they don’t need a lot of extra care.
6. How do epimediums handle different climate zones, and any tips for extremes?
Epimediums thrive in USDA zones 4 through 8, proving themselves resilient against both frigid winters and temperate summers. In the warmer zones, I’ve found that a little extra mulch does wonders, keeping the roots cool, and providing deeper shade helps prevent leaf scorch. For those of us in chillier climes, it’s wise to choose hardy varieties and make sure the soil drains well to avoid damage from the freeze-thaw cycle. My own plots have weathered snowy winters with barely a trace of dieback. The secret? Acclimation. Starting with plants from a local nursery, ones already accustomed to your area’s climate, is the best way to ensure success.
7. What should I do if my epimediums aren’t blooming as expected?
Epimediums sometimes shy away from flowering, and the culprits are often insufficient light or nutrient deficiencies. To remedy this, I’ve found success by giving them a bit of filtered sunlight and a phosphorus-heavy fertilizer in the autumn, which seems to coax out the blooms. If the plants are crowded, that can also be a problem, so dividing them can help. And remember, young plants often prioritize root development, so a little patience goes a long way. From what I’ve seen, tweaking these elements generally restores that lovely springtime show within a year or two.
8. Can epimediums be used for erosion control on slopes?
Absolutely. Epimediums, with their spreading rhizomes, are perfect for holding soil on gentle slopes in the shade. I’ve used them on embankments, where they effectively bind the earth, stopping erosion when the rains come. Pair them with native grasses to strengthen the hold, and don’t skimp on the mulch to keep moisture in on those inclines. While they’re not suited for steep or sun-baked areas prone to erosion, they’ve proven to be a natural, low-maintenance answer in my gardens, especially in woodland-like settings.