In This Article
Hello, other gardeners! If you’ve ever walked through a wild patch of woods and seen clusters of deep purple berries hanging from tall, leafy shrubs, you’ve probably seen an elderberry plant. I’ve been taking care of berry gardens in my backyard for 15 years, and I’ve grown to love elderberry plants because they can be used in so many ways. They not only give you a lot of berries that are great for making jams, pies, and even syrups that boost your immune system, but they also have a lot of health benefits, like antioxidants and vitamins, that have kept my family from getting sick naturally. An elderberry plant also adds a touch of wild beauty to the landscape. It attracts pollinators and birds and fills in those empty spots in the garden with thick leaves. Planting an elderberry plant is one of the best ways to mix food, medicine, and beauty in your yard, whether you’re a beginner or an experienced gardener. Let’s talk about everything you need to know to get started and keep your elderberry plant healthy.
To give you a quick overview, here’s a handy table summarizing the key details about the elderberry plant:
Field | Details |
Botanical Name | Sambucus nigra or Sambucus canadensis (depending on variety) |
Common Name | Elderberry Plant |
Plant Type | Deciduous shrub |
Mature Height & Spread | 6-12 feet tall, 6-10 feet wide |
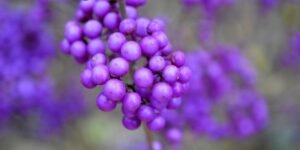
Berry Color | Deep purple-black (common), or red in some varieties |
Bloom Season | Late spring to early summer |
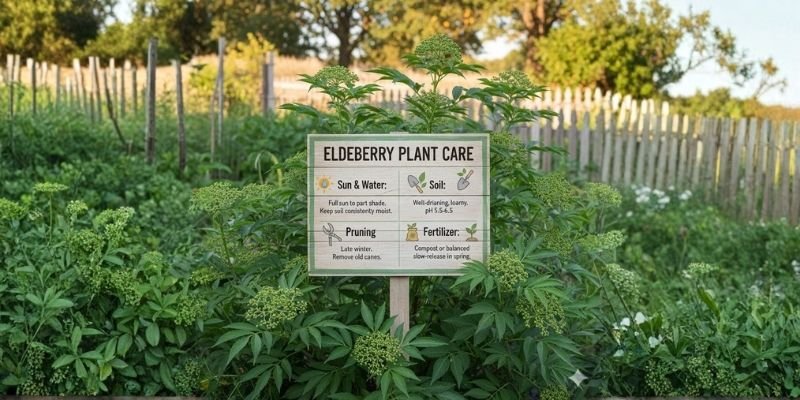
Sun Requirement | Full sun to partial shade (at least 6 hours of direct sunlight) |
Soil Type | Rich, moist, well-draining loam; tolerates clay but not waterlogged |
Water Needs | Moderate; keep soil consistently moist, especially in the first year |
USDA Zones | 3-9 (hardy in most temperate regions) |
Maintenance Level | Low to medium; occasional pruning and monitoring for pests |
What is an Elderberry Plant?

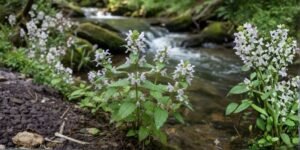
An elderberry plant is a tough shrub with many stems that grows in North America and parts of Europe. It is a member of the honeysuckle family. In my experience, it grows quickly and can reach up to 12 feet if not kept in check. It also spreads by sending out suckers from the ground, which makes dense thickets. The leaves are compound and have serrated edges, which makes the plant look fluffy and pretty even before it blooms. In late spring, the elderberry plant blooms with flat-topped clusters of small white or cream-colored flowers that smell sweet and attract bees like magnets. By the end of summer or the beginning of fall, those flowers turn into drooping clusters of small, juicy berries, usually dark purple-black, that are a common ingredient in traditional medicines. But keep in mind that raw elderberry berries can be poisonous if they aren’t cooked right, so always process them to be safe. The elderberry plant is a great addition to any garden because it goes through this cycle of growth, from leafy green shoots to branches full of berries.
Why You Should Plant an Elderberry in Your Garden
It’s very satisfying to take care of an elderberry plant and get its benefits year after year. The edible berries are a big deal. I’ve made elderberry wine, teas, and jellies that taste like a mix of tart grapes and blackberries. The elderberry plant is well-known for its antiviral properties, and I’ve used homemade elderberry syrup during flu season to keep sniffles at bay. Planting an elderberry plant helps local wildlife in your yard. Birds eat the ripe berries, and butterflies flock to the flowers, which increases the variety of life in your yard. It’s also very easy to grow; once it’s established, the elderberry plant can handle a wide range of conditions, from wet soils to dry spots, which makes it great for beginners. Elderberry plants have even helped stop erosion on slopes in my backyard, and they grow quickly, so they make good privacy screens. The elderberry plant is hard to beat if you want to add a shrub that doesn’t take much work and gives you a lot of benefits, like food, medicine, and a place to live.
Seasonal Care Calendar
Caring for an elderberry plant shifts with the seasons, and I’ve found that following a simple routine keeps mine healthy and productive. Here’s a table outlining key tasks throughout the year:
Season | Care Tasks |
Spring | Prune back old canes to encourage new growth; apply mulch; check for emerging pests; fertilize lightly with compost. |
Summer | Water deeply during dry spells; monitor for aphids or powdery mildew; harvest flowers if desired for teas. |
Fall | Harvest berries when fully ripe; remove any diseased branches; add a layer of organic mulch for winter protection. |
Winter | Minimal care needed; prune heavily if reshaping; protect young plants from harsh winds with burlap if in colder zones. |
How To Plant And Care For Elderberry Plant
Taking care of an elderberry plant is not rocket science; all you have to do is give it some love and make its environment as close to its natural one as possible. I’ve planted dozens of them in different yards over the years, and the key is to be patient and watch. Let’s break it down step by step.
Step 1: Pick the Right Place to Plant
The key to success is finding the right place for your elderberry plant. I’ve always tried to find places with full sun for at least six hours a day to get the most berries. In hotter climates, though, partial shade works to keep the leaves from getting too hot. Elderberry plants do best in moist but not soggy conditions, so stay away from low-lying areas that are prone to frost pockets or constant waterlogging. I planted mine near a fence line in my garden where it gets morning sun and afternoon dappled light. This has helped it spread naturally without taking over other beds. Consider wind protection too; these shrubs can get tall and floppy in exposed areas, so a sheltered corner or alongside other bushes is ideal.
Step 2: Get the soil ready by making it rich and able to drain well.
Preparing the soil is very important for an elderberry plant to grow strong roots. I test the pH first. It should be between 5.5 and 6.5, which is slightly acidic to neutral. Then I add organic matter like compost or aged manure to make the soil more fertile. If your soil is heavy clay like mine was at first, dig a hole that is twice as wide as the root ball and mix in some leaf mold to help with drainage. Elderberry plants like soil that is full of nutrients but not standing water. Adding sand or perlite can help keep the roots from rotting. I forgot to do this step on one of my first plantings and lost a sapling because the drainage was bad. Lesson learned!
Step 3: Choosing Healthy Elderberry Plant Saplings
Choose healthy, strong elderberry saplings from a trusted nursery when you buy one. Look for ones with more than one stem, healthy green leaves with no spots, and a strong root system that isn’t stuck in the pot. In early spring, bare-root stock has worked well for me because it’s cheap and easy to grow. Don’t buy any that have wilted leaves or signs of pests. A healthy elderberry plant should feel strong and have new growth buds. If you’re just starting out, choose varieties that do well in your zone. I’ve grown both native and cultivated types, and starting with a one- or two-year-old plant will help you get berries faster.
Step 4: Putting the plants in the right place and at the right depth
If you get the depth right, your elderberry plant will grow quickly. Plant so that the crown is level with the ground and the roots are buried but the stems are not. For airflow and easy harvesting, space them 6 to 10 feet apart. I’ve grouped mine in groups of three to make them look fuller, but too many plants can cause competition. Firm the soil around the roots gently, and then cover it with wood chips to keep it moist. From what I’ve seen, planting elderberry in the fall or early spring gives the plant time to settle down before the heat of summer.
Step 5: Watering to Help Roots Grow
Watering is very important, especially in the first year when the elderberry plant is growing its roots. I water deeply once a week, soaking the soil to about 12 inches, but let it dry slightly between sessions to encourage deep roots. During dry spells, water twice a week instead of once a week, but always check the soil with your finger first. Too much water can drown the roots. Mulch also helps by keeping water in the soil and keeping weeds down. One summer, regular watering turned a sickly elderberry plant into a berry powerhouse by the next season.
Step 6: Give them food and fertilizer to help them grow strong.
If you don’t want your elderberry plant to have lots of leaves but not many berries, don’t feed it too much. In the spring, I use a balanced organic fertilizer, like compost tea or fish emulsion, to get things going. A light top-dressing of bone meal in the middle of summer adds phosphorus for fruiting. Don’t use chemical fertilizers; they’ve burned my plants before. Instead, use natural amendments like mulch and compost piles, which the elderberry plant likes best because they release nutrients slowly.
Step 7: Pruning to Improve Airflow and Berry Production
Pruning your elderberry plant will keep it healthy and in shape. In late winter, I cut back the old canes to the ground, leaving 4 to 6 strong ones on each plant to let in more light and air. Cut off any dead or crossing branches to stop the spread of disease. I have learned that pruning the plants once a year doubles the amount of berries they produce. If I don’t do this, the plants get tangled and the amount of berries they produce goes down. Be careful with young elderberry plants. They don’t need much trimming until they’re established.
Step 8: Taking care of pests, diseases, and berry problems
Aphids and borers are two types of pests that can attack elderberry plants, but I’ve been able to keep them away with neem oil sprays or ladybug releases. In humid weather, keep an eye out for powdery mildew. Good spacing and pruning can help keep it from happening. If birds are stealing your berries, put nets over the clusters as they ripen. Poor drainage causes root rot, which is the main cause of death. Make sure the soil drains well. In my yard, planting marigolds next to the elderberry plant has naturally kept a lot of pests away.

Step 9: Taking care of and maintaining your elderberry plant for a long time
As time goes on, keep an eye on your elderberry plant for suckers and thin them out to keep them from spreading. Every year, add new mulch and test the soil every few years. A winter mulch blanket protects roots in colder areas. Pick berries right away to keep them from getting moldy, and always cook them. An elderberry plant can live for more than 20 years if you take care of it properly. Mine are still going strong after ten years.
The Best Types of Elderberry
Different types of elderberry plants have different flavors and uses. My favorite medicinal syrup is black elderberry (Sambucus nigra), which has big, sweet-tart berries. American elderberry (Sambucus canadensis) is tough and grows a lot, making it great for pies. Red elderberry (Sambucus racemosa) is pretty, but its berries aren’t as tasty. Hybrids like “York” or “Adams” give you more crops and are less likely to get sick. I’ve grown “York” because it always gives me good crops, no matter what the weather is like.
Things beginners should not do
Elderberry plants can be hard for new gardeners to handle. The worst thing is bad drainage; planting in wet soil makes plants die quickly. Another reason is that they are too crowded. Give them room or they will fight and get weaker. If you don’t prune, the growth will be thick and prone to disease. Don’t put them in full shade because they won’t get enough sunlight and will make fewer berries. I’ve seen people skip soil preparation, which can lead to nutrient deficiencies. Always amend first.
Ideas for landscaping and tips for designing a garden
An elderberry plant looks great in creative gardens. You can use it as a hedge to keep people out of your yard by planting plants 6 feet apart. In borders, plant with perennials like coneflowers to attract pollinators. Put elderberry plants close to bird feeders to attract songbirds to your wildlife garden. Put blueberries in berry patches to make a bed of mixed edible plants. I’ve made a corner of my yard with elderberry plants behind herbs. It looks great and is useful at the same time.
More Berries and Healthier Shrubs: Expert Advice
What works after years of being in the dirt: To get more fruit, plant two different kinds of plants so they can cross-pollinate. Use reflective mulch instead of nets to keep birds away. Plant garlic with other plants to keep pests away naturally. Drip irrigation saves water and focuses on roots in dry years. Pick flowers only when you need them so that there are still enough for berries. Change up how you use compost on your shrubs to make them healthier. My elderberry plants grow like crazy after I add worm castings.
Ways to grow (cuttings, suckers, and seeds)
It’s easy and free to grow an elderberry plant. In early summer, cut 6-inch softwood stems with leaves, dip them in rooting hormone, and plant them in moist potting mix in indirect light. The roots will grow in 4 to 6 weeks. It’s easier to suckers: In the spring, dig up young shoots from the base, replant them right away with their roots intact, and water them well. Seeds need to be stratified, which means they need to be chilled in wet sand for 90 days before being planted in trays. It takes months for them to germinate, but it’s worth it for patient growers. I’ve used all three methods to successfully make my patch bigger.
To sum up, the elderberry plant is a great choice for home gardeners because it produces tasty berries, is good for your health, and adds charm to your garden with little effort. Try it out; you’ll be hooked!
FAQs –
1. How long does it take for an elderberry plant to make berries?
Most young elderberry plants start to bear fruit in their second or third year after being planted, but this can vary depending on the type and the conditions in which they are grown. In my experience, keeping the soil moist and getting full sun speeds this up. Some hybrids, like “Adams,” even bear fruit earlier. Plant more than one to make sure cross-pollination happens, and don’t prune too much in the first few years so the plant can focus on growing roots instead of getting immediate yields.
2. Can I put an elderberry plant in a pot?
Yes, elderberry plants do well in large pots, at least 20 gallons, for patios or small spaces. Add compost to a potting mix that drains well, and water the plants more often because pots dry out faster. This is how I’ve successfully grown dwarf varieties. To keep the roots from getting stuck, I repot them every two to three years and bring them inside during the winter in very cold areas.
3. Do elderberry plants take over gardens?
Elderberry plants can spread by suckers, but they aren’t really a problem if you keep an eye on them. I keep spread under control in my yard by mowing around the base or digging out extras every year. Be careful when choosing non-native plants in the wild, but in your own garden, regular maintenance keeps them in check while still letting them grow naturally to make berries.
4. What other plants go well with an elderberry plant?
You can naturally add nutrients to the soil by planting elderberry plants with nitrogen-fixing plants like clover or beans. Herbs like mint and chives keep pests away, and flowers like bee balm bring in pollinators to help set fruit better. I planted raspberries with other berries to make a berry guild. This makes the patch self-sustaining, which means less weeding and better health overall.
5. How do I pick and keep berries from an elderberry plant?
Cut off whole umbels when the clusters are fully dark and droop, which is usually in late summer. Gently rinse, then freeze or dry for storage. Cooked berries last for months in syrups. I’ve learned to process quickly to stop fermentation, which gives me jars of preserves that last through the winter.
6. Is an elderberry plant safe from deer?
Not entirely—deer eat young shoots, but mature elderberry plants are somewhat resistant because they are big and taste good. I’ve used fencing and repellents like soap sprays with success. Planting in groups with thorny plants like roses also helps keep browsers away while keeping the look natural.
7. Once elderberry plants are established, can they handle drought?
Elderberry plants with deep roots can handle short dry spells, but long periods of drought make the berries smaller. During heat waves, mulch thickly and water. In my drier seasons, watering every ten days kept production steady without overwatering.
8. What kinds of soil amendments work best for elderberry plants?
Leaf compost or aged cow manure are examples of organic matter that can help elderberry plants grow better and have better structure. If you need to, you can add gypsum to clay soils to help them drain better, or sulfur to lower the pH. I’ve used coffee grounds to top-dress over time to make the soil more acidic, which has made the leaves grow thicker and the berries more plentiful.