In This Article
Hey there, gardeners! Let me tell you about the chokeberry bush if you want to add a tough, useful plant to your yard that gives you delicious berries, beautiful fall colors, and needs very little care. After 15 years of digging in the dirt and caring for native shrubs, I’ve grown to love this hidden treasure. It’s not just the berries that are great—those tart little fruits make great jams and pies—but also how it lights up the fall landscape with bright reds and oranges. Also, it’s a low-maintenance powerhouse that does well where other plants might not, attracting birds and pollinators without asking for much in return. Planting a chokeberry shrub can make your garden a productive and beautiful place, no matter how experienced you are with plants.
To get us started on the right foot, here’s a quick overview of the chokeberry bush’s key traits in an easy-to-reference table. I’ve pulled this together based on what I’ve seen in my own plots and those of friends across different zones.
Field | Details |
Botanical Name | Aronia melanocarpa (black), Aronia arbutifolia (red) |
Common Name | Chokeberry |
Plant Type | Deciduous Shrub |
Mature Height & Spread | 3-6 feet height, 3-6 feet spread (up to 10-12 feet for some varieties) |
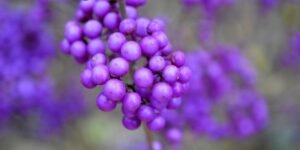
Berry Color | Black or red, depending on variety |
Bloom Season | Late spring to early summer |
Sun Requirement | Full sun to partial shade |
Soil Type | Moist, well-drained, slightly acidic |
Water Needs | Moderate; tolerates wet conditions |
USDA Zones | 3-9 |
Maintenance Level | Low |
What is a Chokeberry Bush?

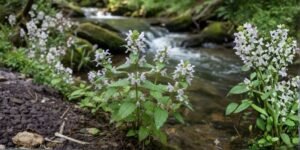
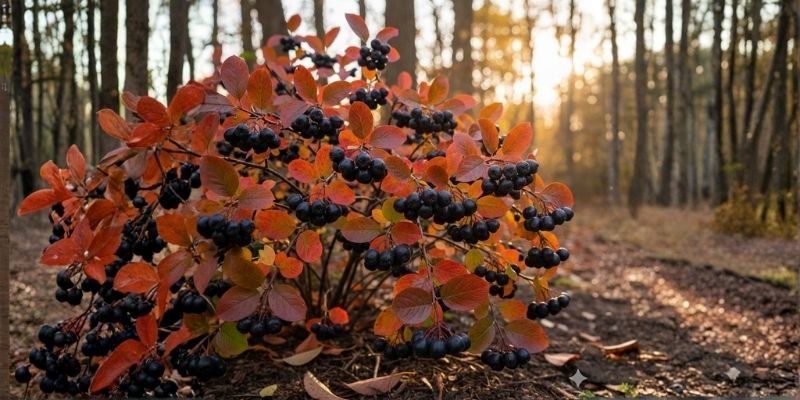
The chokeberry bush is a native North American shrub that has been a part of wild landscapes for hundreds of years. It is now making a comeback in home gardens for good reason. These plants grow as bushes with many stems, and if you leave them alone, they will often form dense thickets. This makes them great for natural barriers. Like apples and cherries, they are in the rose family. You can see this in the small, white-to-pink flowers that bloom in the spring and turn into clusters of berries by late summer. The fruit is what gives it the “choke” name—when you eat them raw, they’re very tart, but they’re full of antioxidants and great for cooking. Over the years, I’ve picked buckets of chokeberries from my shrubs. They can handle everything from wet soil to dry spells without missing a beat. Expect a rounded, upright habit that grows from the base and sends out suckers to form colonies that can spread if you don’t keep an eye on them.
Why should you plant a chokeberry bush in your garden?
There are a lot of reasons why a chokeberry shrub should be in your yard. I’ve planted dozens of them in different ways and seen the benefits for myself. First of all, those berries that you can eat are a game-changer. They are superfoods full of vitamins, and I have made syrups, wines, and even smoothies with them when I mix them with sweeter fruits. Wildlife loves them too: birds flock to the ripe clusters in the fall, and pollinators buzz around the flowers in the spring, making your garden more diverse. The leaves change color in the fall, turning bright shades of red, purple, and orange that are just as dramatic as any maple tree. The chokeberry bush is tough and can handle cold winters, pests, and bad soil, making it great for gardening that doesn’t take much work. They’ve anchored rain gardens and spots that are prone to erosion in my backyard. They keep the soil in place and add interest all year long. This plant is a great choice if you want something that looks good and is useful.
Seasonal Care Calendar
To keep your chokeberry bush thriving through the year, I’ve found it helps to follow a simple seasonal routine. Here’s a calendar table based on what works in my zone 5 garden—adjust for your local climate, but these basics hold up.
Season | Key Tasks |
Spring | Prune lightly to remove dead wood; apply mulch; fertilize with organic compost; watch for new growth and water if dry. |
Summer | Water deeply during droughts; monitor for pests like aphids; harvest berries as they ripen; weed around the base. |
Fall | Enjoy the foliage color; harvest remaining berries; add a layer of mulch for winter protection; avoid heavy pruning. |
Winter | Minimal care needed; check for snow damage; plan for spring divisions if spreading too much. |
How To Plant And Care For Chokeberry Bush
It’s not rocket science to plant and care for a chokeberry bush. Just give it a good start and let its natural toughness show. I’ve planted these in sunny meadows and shady edges of woods over the years, and they have hardly ever let me down. I’ll show you the steps I’ve learned through trial and error below, focusing on both planting them and keeping them happy for a long time. Keep in mind that patience and observation are your best tools, whether you’re working with a young chokeberry shrub or an older one.
Step 1: Pick the Right Place to Plant
Choosing the right spot in your yard is the first step to growing a healthy chokeberry bush. In my experience, these shrubs do best in full sun, where they make the most berries and bright fall colors. However, they can also grow well in partial shade. I have a few that are doing well under light tree cover and still make fruit. To keep fungi from growing, look for a spot with good air flow. Chokeberry shrubs like moisture but don’t like being too wet, so wetter spots might be good too. I put one in my garden near a downspout where water collects, and it has grown like crazy. Just stay away from places that are very dark or very dry, as these can slow them down. Also, think about how big they will get when they are full grown. Give them space to grow without getting too close to other plants.
Step 2: Get the soil ready by making sure it drains well and has a lot of organic matter in it.
A lot of people mess up when they prepare the soil, but doing it right will help your chokeberry shrub grow well. These bushes like soil that is a little acidic, with a pH between 5.5 and 7.0. They have done great things for my clay-heavy ground since I changed it. To make the soil drain better and be more fertile, dig a hole that is twice as wide as the root ball and add a lot of organic matter, like compost or old manure. I have used leaf mold from my compost pile with great results. If your soil is too alkaline, you can add some pine needles or sulfur to make it a little more acidic. First, check your soil. I always use a kit from the garden store to quickly check the pH. This preparation helps roots grow quickly, making your chokeberry bush a strong producer.
Step 3: Choosing Healthy Chokeberry Shrubs
Choosing healthy stock is very important for your chokeberry bush when you’re ready to buy. In the spring or fall, go to a nearby nursery and look for plants with strong stems, no signs of wilting, and a healthy root system. If you can, look at the bottom of the pot. I now know to stay away from specimens that are too tall or have roots that are too tightly bound. Instead, I choose ones that are about 2 to 3 feet tall so they can grow faster. Different kinds of chokeberry shrubs matter too. Black chokeberry shrubs tend to be shorter, while red ones can grow taller. If you order online, read reviews to make sure your order arrives in good shape. Starting with good quality means less trouble later on, and the chokeberry bushes that gave me the most fruit came from trusted sources.
Step 4: Putting the plants in the right place and at the right depth
Now comes the fun part: putting the chokeberry shrub in the ground. The best time to plant is in the early spring or fall when the weather is mild. Dig a hole that is just deep enough for the top of the root ball to be level with the soil surface. If you bury it too deep, it will rot. For individual bushes, I’ve spaced mine 4 to 6 feet apart, and for hedges, I’ve spaced them 3 feet apart, which gives them room to grow. Gently pull out any roots that are circling, put it in, fill the hole with your amended soil, and press it down to get rid of air pockets. Use wood chips as mulch around the base to keep moisture in. I’ve seen this simple step double the survival rate in hot summers. Your new chokeberry bush will thank you by rooting quickly.
Step 5: Watering to help the roots grow
In the first few months, watering is very important to help your chokeberry bush get used to its new home. After planting, I water deeply to soak the soil and encourage the roots to go down. Then, I keep the soil moist but not soggy, giving it about an inch of water a week if it doesn’t rain. In my experience, young chokeberry bushes need more care when the weather is dry, but once they are established, they can handle dry spells very well. For even distribution, use a soaker hose, and to check the moisture in the soil, stick your finger in a few inches. Over time, I’ve cut back on deep waterings to once in a while and let nature take care of the rest, which makes the plants stronger.
Step 6: Give them food and fertilizer to help them grow.
A light feeding schedule is best for the chokeberry bush because it helps it grow and produce berries. I don’t use heavy chemical fertilizers; instead, I use organic ones. In the spring, I spread a balanced compost or slow-release granular fertilizer around the drip line and lightly work it in. My chokeberry shrubs like acidic soil, so I use something with iron or for acid plants. I don’t want to use too much nitrogen because that makes all the leaves and no fruit. I put down mulch that breaks down on its own every few years. This method has kept my bushes healthy and full of berries without hurting the roots.
Step 7: Trimming and shaping to improve airflow
Pruning your chokeberry shrub keeps it neat and productive, but don’t do too much. I trim the branches in late winter or early spring, before the buds break. I take off dead or crossing branches to let more light and air into the center. Every few years, I cut back the older stems at the base of suckering chokeberry bushes to make them new again. I’ve done this to bushes that were too big, which increased the number of berries they produced. Don’t shear like a hedge unless that’s what you want to do. Natural shapes look best. They’ve stayed small and healthy, keeping diseases away, thanks to the changes I’ve made by hand.
Step 8: Taking care of pests, diseases, and berry problems
Even tough plants like the chokeberry bush can have problems, but taking care of them ahead of time can help. Aphids sometimes show up on new growth in my gardens, but a strong blast from a hose or ladybugs take care of them naturally. If there is good airflow, fungal spots on wet leaves are rare. If they do show up, I take out the affected parts and make the spacing better. Birds love the berries, so if you need to, you can put up a net to keep them away. I’ve lost a few crops before I learned that. Deer might nibble, but planting with plants that have thorns keeps them away. In general, chokeberry shrubs are tough, and keeping an eye on them keeps problems small.

Step 9: How to Care for and Maintain a Chokeberry Bush for a Long Time
To care for a chokeberry bush over the long term, all you need to do is watch it and do as little as possible. Every year, put down mulch to keep weeds down and keep moisture in. If suckers spread too far, divide them every 5 to 7 years. I’ve done this to get free plants. Watch for signs of stress, like leaves turning yellow, which could mean pH problems, and make changes as needed. A burlap wrap protects young chokeberry shrubs from windburn in very cold winters. With this routine, mine have lasted for decades, giving me endless berries and beauty with little work.
The Best Types of Chokeberry
I’ve grown both red and black types, and each has its own charm when it comes to choosing. Black chokeberry shrubs, like “Viking” or “Nero,” are small but powerful plants that grow to about 5 feet tall and produce a lot of fruit. The dark purple-black berries are high in antioxidants and make great juice. The ‘Brilliantissima’ red chokeberry bush grows taller and has shiny red berries that stay on the bush all winter. They provide food for birds and add color, and they are just as tough as other types of chokeberry bushes. Both do well in similar conditions, so pick the one that fits your space and berry tastes.
Things Beginners Shouldn't Do
I’ve helped a lot of new gardeners, and I’ve seen a lot of mistakes with chokeberry bushes that are easy to avoid. One big problem is not giving them enough space. If you plant them too close together, they will become crowded and disease-prone. Give them 4 to 6 feet. If you water established plants too much, their roots will rot. These shrubs like moisture but not wet feet. And a lot of pruning in the fall? That cuts off the buds for next year, which means you won’t get as many berries. Don’t use chemical sprays either; natural methods work just as well and don’t hurt pollinators. Start off smart and learn from my early mistakes.
Ideas for landscaping and tips for designing a garden
In my opinion, chokeberry shrubs are the best plants for landscaping because they can be used in so many different ways. Plant them 3 feet apart as a hedge for privacy. In the fall, they will be a dense screen full of color. Mix with perennials like coneflowers in borders to make a paradise for pollinators. I’ve used them in wildlife gardens, where the berries feed birds and the structure gives them a place to stay. For mixed shrub beds, pair them with viburnums or dogwoods to add depth. My favorite way to do this is to put a chokeberry bush in a rain garden to handle wet spots in style. They even work in small spaces, like on patios, where they add flavor to food.
More berries and healthier shrubs: expert tips
Based on years of experience, here are my best tips for getting the most out of your chokeberry bush. For better pollination and bigger harvests, plant in groups. I have doubled my yields by planting three or more plants together. Use acidic materials like pine bark as mulch to keep the pH level stable. Don’t over-fertilize to get more berries; a light touch will help fruit grow more than leaves. Deep watering once a week is better than shallow sips every day when it’s dry. And don’t pick all the berries; leave some for birds to eat so they can keep pests in check. These changes have turned my average chokeberry bushes into berry-making machines.
Ways to Grow: Cuttings, Suckers, and Seeds
It’s easy and fun to add to your chokeberry collection. I’ve done it dozens of times this way. In early summer, take 6-inch softwood stems, dip them in rooting hormone, and plant them in wet sand. Keep them in the shade until they grow roots, which should happen in 4 to 6 weeks. Suckers are the easiest. In the spring, dig up young shoots with roots attached from the base, replant them right away, and water them well. They grow quickly. Seeds need stratification: gather ripe berries, clean the pulp, put the seeds in damp sand in the fridge for 90 days, then plant them in pots. It can take up to a year for them to germinate. For the best results, start with healthy parent chokeberry bushes, no matter which way you do it.
In conclusion, the chokeberry shrub is a great plant for any garden because it’s easy to grow, gives you berries and beauty, and doesn’t take much from the garden. Try it out, and you’ll see why it’s become a regular part of my yard.
Questions and Answers
1, What are the health benefits of chokeberry berries, and how can I use them in cooking?
Chokeberries are full of antioxidants, vitamins C and K, and fiber, which I’ve found help with everything from digestion to immune health. I’ve baked them into muffins by mixing them with apples to make them sweeter, or I’ve simmered them into a sauce for meats. When you cook them, the tartness goes away. You can freeze them for smoothies or make a simple jam with sugar and lemon. Just pick them when they are fully ripe for the best flavor without too much pucker.
2. Can I grow chokeberry bushes in pots, and how big do they need to be?
Definitely! I’ve been able to grow chokeberry bushes in pots on my deck for years, especially in cities where there isn’t much ground. Use a well-draining potting mix with compost to fill a container that holds 15 to 20 gallons. Water them more often than plants that are in the ground, and in colder areas, move them to a protected area for the winter. You won’t get as many berries, but you’ll still get that fall glow.
3. How do chokeberry bushes deal with very bad weather, like floods or droughts?
I’ve seen that chokeberry shrubs are very adaptable, even in tough seasons. Once they are established, they can handle short dry spells by using their deep roots. However, mulch helps keep the soil moist. When it rains, their love for wet weather really shows. They’ve done better than most shrubs at surviving standing water in my low-lying areas. Just make sure they have good drainage over time so they don’t rot, and they’ll be fine.
4. Are there any plants that go well with chokeberry bushes?
I’ve had great luck putting chokeberry bushes next to native plants like serviceberry for similar berry vibes and staggered harvests, or elderberry for a place where animals can come and go. For texture, plant ferns or hostas in shady areas, or add asters for fall blooms that go well with the leaves. To keep the soil happy, don’t plant aggressive spreaders that might compete with each other. Instead, plant acid-loving plants.
5. How do you pick and store chokeberry berries in the best way?
Pick the berries when they are fully colored and a little soft, usually from late summer to early fall. I pick them by hand in groups to avoid bruising. Gently rinse, then freeze on a sheet before putting in a bag for up to a year. This keeps the nutrients. Spread out on screens in a warm place to dry. I’ve put jars of preserved berries in the pantry so I can make teas or compotes out of them in the winter.
6. Do chokeberry bushes draw certain animals, and how can I get them to come?
Yes, they attract robins and cedar waxwings that eat the berries, and bees love the flowers that bloom in the spring. Plant in groups and leave some fruit unpicked to make this better. I’ve made mini habitats this way. Adding a birdbath nearby brings in more people, and not using pesticides helps the ecosystem stay healthy. It’s fun to see what happens around a mature chokeberry shrub.
7. How long does it take for a chokeberry bush to make berries?
In my plantings, the first light crop should be ready in 2 to 3 years, and the bush should be fully grown by years 4 to 5. Things like how much sun they get and how quickly they pollinate speed this up. Cross-pollination from more than one plant helps. Be patient; the wait is worth it for those big clusters.
8. Can I grow chokeberry bushes from berries I buy at the store?
It’s possible, but it’s not easy because berries from the store might not be good or true to type. Take out the seeds, stratify them like I do with seeds from my own garden, and then plant them. I like to start with nursery stock or my own propagations because the success rates are different. If you want to try, use organic berries to improve your chances.