In This Article
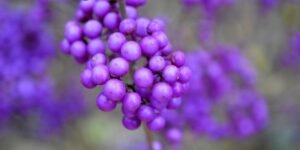
Hey there, fellow gardeners! If you’ve ever wandered through a sunny garden bed bursting with vibrant, snapdragon-like blooms that seem to last forever, chances are you’ve spotted the angelonia plant. This tough little beauty, often called the summer snapdragon, has become a staple in my home garden here in a warm, tropical-like climate where the heat can really test a plant’s mettle. What makes the angelonia plant so popular? Well, it’s all about those long-lasting flowers that keep pumping out color from spring right through to fall, without demanding much fuss. The Angelonia Flower comes in shades of purple, pink, white, and even blue, adding a cheerful vertical accent to borders, containers, or hanging baskets. Over my 15-plus years of tending to flowering plants, I’ve found that the angelonia plant thrives in hot weather, making it a go-to for anyone wanting reliable blooms that laugh in the face of summer swelter.
To give you a quick overview before we dive into the nitty-gritty, here’s a handy table summarizing the key details about this resilient performer:
Botanical Name | Angelonia angustifolia |
Common Name | Summer Snapdragon, Angelonia Flower |
Plant Type | Annual or tender perennial |
Mature Height & Spread | 12-24 inches tall, 12-18 inches wide |
Sun Requirement | Full sun (6+ hours daily) |
Soil Type | Well-draining, loamy or sandy |
Blooming Season | Late spring to first frost |
Water Needs | Moderate, drought-tolerant once established |
Maintenance Level | Low |
How to Grow and Care for Angelonia Plant

Growing and caring for the angelonia plant isn’t rocket science—it’s more like a rewarding partnership where you set it up right, and it rewards you with endless Angelonia Flowers. I’ve planted countless angelonia plants in my garden over the years, experimenting with different spots and techniques, and I’ve boiled it down to these essential steps. Follow along, and you’ll have a thriving display that brightens your space all season long.
Step 1: Choose the Right Location
The first consideration when adding angelonia plant to my garden is always the location. I try to replicate its natural setting: warm, sunny, and shielded from strong winds. From what I’ve seen, these plants thrive in spots where they can soak up the heat without being exposed to the elements. A south-facing wall or raised beds that retain warmth into the evening are ideal. If you’re in a tropical or subtropical area, steer clear of low-lying areas that tend to hold water, since angelonia doesn’t like its roots to be waterlogged. Consider companion plants as well; I’ve had good luck pairing them with lantanas or salvias, creating a pollinator-friendly mix that really showcases the angelonia’s flowers. Once you’ve found the right spot, the plant establishes itself quickly and gets to work on those abundant blooms.
Step 2: Provide Proper Sunlight
Sunshine is key to a thriving angelonia, and I’ve discovered that cutting corners on light results in those unwieldy, stretched-out stems and fewer blossoms. Strive for a minimum of six hours of direct sunlight daily; in hotter regions, where the Angelonia plant truly flourishes, more is preferable. In my own garden, I position them to catch the morning sun first, allowing them a gentle start before the harsher afternoon light. If your yard offers partial shade, the angelonia might still do well, but anticipate less prolific flowering. Adjust container placement as necessary to guarantee consistent exposure, and observe the plant’s reaction; it’ll signal its contentment by producing those erect, colorful spikes that attract butterflies and hummingbirds.
Step 3: Prepare Well-Draining Soil
Soil preparation can be a sticking point, but nailing it is key to a thriving angelonia. These plants are particular about their footing, needing well-draining soil to avoid root rot. I always start by amending my garden beds with a blend of compost and sand, which gives them a loose, nutrient-rich foundation. In tropical regions where clay dominates, I’ve found that incorporating perlite or even tiny gravel significantly improves drainage. Believe me, your Angelonia Flower won’t flourish in compacted, soggy soil. Check your soil’s pH; a range of 6.0 to 7.0, slightly acidic to neutral, is ideal. And don’t over-fertilize at this stage. From my own experience, a good indicator that you need to make a change is if water collects after a rain. If that’s the case, consider raising the bed or adding more organic matter to ensure the roots have room to breathe.
Step 4: Planting Angelonia the Right Way
Getting the angelonias to establish themselves successfully is a matter of when and how you plant them. I find it best to start with nursery-bought young transplants in late spring when the risk of frost is no longer an issue. Plant them about a foot apart to give them space to develop into that bushy characteristic. Once you are ready to plant, dig a hole twice the width of the root ball, but only just as deep. Lightly loosen any circling roots around the root ball to encourage growth outwards.
Fill in with your amended soil, tapping it in lightly to remove any trapped air and then water it well to settle it. If containers are your game, I have found that pots with drainage holes work best. Use a good potting mix and then the Angelonia plant will have the right environment to spill over the sides. And remember in warmer areas that a layer of mulch around the base will help keep moisture in but be careful not to cover the stems.
Step 5: Watering for Healthy Growth
Watering angelonia plant is also somewhat tricky. If you give too much water, you’re begging for fungus, but too little water, and the flowers will quit blooming. I’ve found while gardening that giving angelonia plant a good, deep watering but doing it less frequently is probably the ticket. I water mine when the surface inch of soil is completely dry, and I’ve found that seems to promote deep root growth. Newly planted angelonia, on the other hand, will probably require watering every few days. But after that, angelonia is surprisingly drought-proof, at least when it comes to bringing those beautiful flowers. I also use a soaker hose, which ensures that water reaches directly to the roots, leaving the leaves alone. And when the angelonia wilts, that’s when I know I need to water. I’ve found adjusting that according to rain is also important. By doing all these things, I’ve found that angelonia brings lovely, bright flowers to my garden, no matter what kind of weather is raging outside, especially when that weather is hot, sultry summer weather.
Step 6: Feeding and Fertilizing
To make sure Your angelonia Plant is always in bloom, proper nutrients must be provided, although I have learned that less is often times more in this case. I use one fertilizer with balanced nutrients in the spring when I first plant my angelonia, but then switch to a fertilizer that is meant for increasing blooms around every four or six weeks during my plant’s growing cycle. While choosing my fertilizer, it is essential that it contains high amounts of phosphorus, so my angelonia plant can have plenty of blooms, although it is important that it is cut in half so that it will not hurt my plant’s roots, as this is very important in poor soil such as what is present in warm climates. In addition, I do not use any fertilizer in my angelonia plant in late summer, so my plant can prepare for its end of cycle naturally. Not watering after my plant has been fertilized has always resulted in an enhanced performance for my garden.
However, watering after fertilizing is essential, as it has always resulted in an enhanced plant performance. I have learned that fertilizers can sometimes have very negative consequences if they are used in high amounts.
Step 7: Pruning and Shaping the Plant
Pruning angelonia is surprisingly simple, and the payoff is worth it: fuller plants and a profusion of flowers. I start by pinching the tips of young plants to promote branching. Then, I deadhead the spent blooms, cutting just above a leaf node. This keeps the plant looking neat and sends the plant’s energy to producing new buds. If the plants become leggy in the summer heat, I’ll shear them back by a third. Don’t fret; they’ll recover quickly in tropical climates. Always use clean shears to avoid spreading any potential problems, and shape the plants as needed for that tidy, rounded appearance. Over time, this regular upkeep has transformed my angelonia plants into compact, vibrant displays that truly stand out in my borders.
Step 8: Managing Pests and Diseases
There are always some pests, but angelonia is one tough flower, as long as we keep our eyes open. If we see aphids or spider mites, usually when it gets hot outside, we can check our leaves on a weekly basis and give them a good spraying with a hose. If that fails, we have also tried using insect soap, spraying them in the evenings to avoid scorching our leaves. In addition, we have not experienced any problems with powdery mildew, probably because of sufficient ventilation and watering our angelonia plants indirectly instead of over them. The worst that can happen occurs when we have drainage problems that harm our roots, so remember using well-draining mixes, as already discussed. From my observation, when angelonia plants are healthy, they don’t require any major pampering because of their hardiness, by nature.

Step 9: Seasonal and Long-Term Care
As the seasons change, adjusting how you care for your angelonia plant helps it thrive, particularly if you’re treating it as a perennial where frost isn’t a worry. Living in the tropics, I heap on the mulch in winter to protect any roots from any unexpected cold snaps, and I also divide any clumps if they get too crowded every couple of years to keep them fresh. If you’re growing them as annuals, you can collect seeds from spent angelonia flowers or take cuttings in the fall to keep them going indoors over the winter. Watch for any signs of nutrient deficiencies as the plant ages, adding compost each year to keep it healthy. Over time, I’ve found angelonia plants to be real stalwarts in the garden. They self-seed gently, providing a splash of color with very little effort-just provide that consistent warmth, and they’ll keep rewarding you.
In conclusion, the angelonia is a real find for anyone who wants a garden that practically takes care of itself. It’s remarkably resilient in the heat, which is a blessing for those of us with a lot on our plates. The fact that it thrives even when the going gets tough, all while providing those delightful Angelonia Flowers year after year, is precisely why it’s a mainstay in my own garden.
FAQs
1. What makes the angelonia plant suitable for beginners in gardening?
From my experience with it, I would recommend that anyone starting out with gardening give it a try. It is extremely understanding of newbies’ lack of experience. Unlike some flowers that need to be catered to if you want to see them survive, once this flower is established, it loves full sun, heat, and drought with absolutely zero issues. It blooms away on little flower spikes, giving a very nice effect. This means that new gardeners won’t need to be worried about it for a while. I’ve recommended it to new gardeners in my neighborhood, and all of them love how it brightens their space.
2. Can the Angelonia Flower be grown indoors successfully?
While not the go-to for indoor gardening, I’ve had some success growing Angelonia flowers inside when the weather turns chilly. A bright window facing south, or grow lights, will simulate the sunlight they crave. Keep the pot in a warm place, ideally above 60°F. A good, well-draining soil is essential to prevent soggy roots, and a light misting now and then will help with humidity. The blooms won’t be as abundant as they are outside, but with a little patience, you can still have some lovely flowers. Just be sure to acclimate it back outside gradually in the spring to avoid shocking the plant—it’s a trick I’ve used to extend the growing season.
3. How do I propagate the angelonia plant at home?
Propagating angelonia is a simple and budget-friendly process, one I’ve repeated many times to fill out my garden. To start, take stem cuttings roughly four to six inches long from healthy, non-flowering stems in late spring. Dip the cut ends in rooting hormone and then plant them in moist potting soil. Place the cuttings in indirect light and keep them warm until they develop roots, which typically takes two to three weeks. Seeds are another route; collect them from dried pods and sow them indoors six to eight weeks before the last frost. Regardless of the method, keep the soil consistently moist but not waterlogged—it’s gratifying to see your own plants flourish into vibrant blooms.
4. What companion plants pair well with the angelonia plant?
In my garden, I find angelonia to be an ideal partner for plants that thrive in the heat, ones that really highlight its vertical growth and vibrant hues. Lantana, with its explosion of contrasting flowers, is a great choice, or perhaps petunias, which trail beautifully in containers. Herbs like basil or oregano bring both scent and the benefit of pest control, while taller salvias offer a perfect backdrop. It’s best to steer clear of shade-loving plants, since angelonia prefers that shared sunny space. This combination not only looks fantastic, but it also draws in pollinators, fostering a vibrant ecosystem – I’ve watched these pairings flourish in my own borders for years.
5. Is the Angelonia Flower toxic to pets or children?
Fortunately, the Angelonia Flower is mostly harmless, which is a relief for families. I’ve cultivated it around both kids and cats without any problems, though it’s still best to prevent them from eating it. While a little bit might cause a tummy ache if consumed in excess, it’s not a major concern. Keep an eye on your pets. If you’re worried, you can always place the plants out of reach or use hanging baskets. Overall, it’s a low-risk choice, allowing you to appreciate the flowers without any anxiety.
6. How can I extend the blooming period of the angelonia plant?
To keep those flowers going, I’ve discovered that regularly deadheading the spent ones is essential; it encourages the angelonia to keep blooming. Monthly fertilizing with a formula designed for blooms is also beneficial, particularly in soil that tends to lose nutrients. In hotter areas, offering afternoon shade when the sun is strongest prevents stress, and mulching helps the soil stay moist, which supports consistent growth. If frost is in the forecast, covering the plants or bringing pots inside has given me extra weeks of color during those in-between seasons.
7. What common mistakes should I avoid when caring for the Angelonia Flower?
Overwatering – a mistake I made myself, right from the start. Angelonia, especially, is susceptible to root rot if the soil stays too wet. Let the soil dry a bit before you water again. Another common error is putting them in the shade. These flowers need plenty of sun, or they’ll get leggy. Giving them enough space is also important; crowding them can lead to disease because of poor air circulation. And don’t forget to prune. Regular trimming keeps them looking tidy and compact. Avoid these missteps, and your Angelonia will thrive.
8. Can the angelonia plant survive in cooler climates?
In regions with cooler climates, consider angelonia a seasonal delight. Plant it after the last frost, and savor its blooms until the autumn’s first chill. I’ve suggested to friends in more temperate areas that they bring it inside or into a greenhouse to keep it going year after year. If you’re trying to keep it outside, a thick layer of mulch is essential, but don’t be surprised if you have to replant it annually in zones below 9. Angelonia thrives in heat, so aim for the warmest spots in your garden. With a little attention, you can still enjoy a good show of flowers, even if your climate isn’t exactly tropical.