In This Article
Hello, fellow gardeners! If you’ve ever walked through a garden in the fall and seen those groups of electric purple berries shining like little jewels against the leaves, you’ve probably seen a beautyberry shrub. I’ve been growing these beautiful plants in my own backyard for more than ten years, and let me tell you, they’re one of those plants that just steal the show without asking for much in return. People love beautyberry because it looks great without any effort. The bright berries not only brighten up the landscape when everything else is fading, but the shrub itself is easy to care for and does well with little effort. Beautyberry can add a magical touch of color and wildlife appeal to your space, whether you’re a beginner just getting started with gardening or an experienced gardener looking to add some seasonal flair. In this guide, I’ll share my hands-on tips from years of trial and error that will help you grow your own beauty berry.
To kick things off, here’s a quick overview of the key details about this fantastic shrub in an easy-to-reference table:
Botanical Name | Callicarpa spp. (commonly Callicarpa americana or japonica) |
Common Name | Beautyberry |
Plant Type | Deciduous shrub |
Mature Height & Spread | 4-6 feet tall and wide (some varieties up to 8 feet) |
Berry Color | Vibrant purple, with pink or white options in select varieties |
Sun Requirement | Full sun to partial shade |
Soil Type | Well-draining, loamy or sandy; tolerates average garden soil |
Water Needs | Moderate; drought-tolerant once established |
USDA Zones | 5-10 (depending on variety) |
Maintenance Level | Low to moderate |
What is Beautyberry?

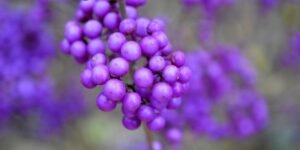
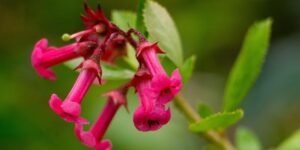
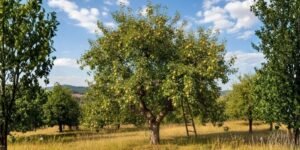
Beautyberry is a lovely shrub that grows in parts of Asia and North America. Its beautiful flowers and tough nature have made it popular in gardens all over the world. I think the best thing about beautyberry is its arching branches that fill out into a round, bushy shape that is about 4 to 6 feet tall and wide. The leaves are a soft green color and are shaped like ovals. In the fall, they turn a pretty yellow color before falling off. But the real star? Those berries! In late summer to fall, they grow in thick clusters along the stems and have that bright purple color that looks almost fake. Depending on the type, I’ve seen beauty berry bushes that make pink or even white berries. It loses its leaves in the winter because it is a deciduous plant. However, during the growing season, it has small pinkish-lavender flowers that attract bees and butterflies. Beautyberry grows in a relaxed, natural way, which makes it feel right at home in casual settings.
Why Grow Beauty Berry in Your Garden?
There are so many great things about adding a beauty berry to your garden. I’ve been taking care of them for years, and they’re more than just pretty faces. For starters, those eye-catching berries provide incredible seasonal interest, especially in the fall when the garden starts to quiet down. They make a great focal point that birds like cardinals and mockingbirds love to visit during their winter migrations to eat the berries. It’s like having your own wildlife sanctuary. Beautyberry is also very easy to care for. Once it gets going, it can handle drought, bad soil, and even some shade without any problems. I use beauty berry in my garden to add color and texture to borders. It looks great with other native plants, which helps biodiversity. Also, many times it doesn’t attract deer because the leaves have a smell that animals don’t like. Beauty berry is a great choice if you want a plant that looks good all year long, from spring flowers to fall berries to bare branches in the winter. It keeps giving with little effort.
Seasonal Care Calendar
Caring for beautyberry follows the rhythm of the seasons, and I’ve put together this simple calendar based on what works in my own yard. It breaks down the key tasks to keep your shrub healthy and berry-laden year after year.
Season | Key Care Tasks |
Spring | Prune back old wood to encourage new growth; apply mulch around the base; watch for emerging pests and fertilize lightly with a balanced product. |
Summer | Water regularly during dry spells; monitor for leaf spot or aphids; deadhead spent flowers if desired to promote more berries. |
Fall | Enjoy the berry display; harvest cuttings for propagation; reduce watering as dormancy approaches; add compost to enrich soil. |
Winter | Minimal care needed; protect young plants from harsh freezes with burlap if in colder zones; avoid pruning until spring. |
How To Plant and Care For Beautyberry
It’s not hard to plant and care for beautyberry. Just give it a good start and let it show off its natural strength. I’ve planted dozens of these bushes in different places on my property over the years, from sunny borders to shady edges of the woods, and they’ve almost always done what I wanted them to do. I’ll show you the steps I take to help your beauty berry grow, mixing basic planting advice with tips for ongoing care.
Step 1: Choose the Right Planting Location
When I plant beautyberry, the first thing I always think about is where to put it. If you get this right, you’ve already won half the battle. Beauty berry does best in full sun to partial shade, but I’ve found that it makes the brightest berries when it gets 4 to 6 hours of direct sunlight every day. I planted some in dappled light under taller trees, and they grow well, but the berry clusters aren’t as big. Don’t put them in deep shade, because that can make them grow leggy and produce fewer fruits. Also, think about your USDA zone. Beautyberry grows best in zones 5 to 10. It can handle heat and humidity very well, but it would like some protection from the cold in the winter. I choose spots in my Haryana garden that get afternoon shade to keep the plants from getting too hot in the summer. Also, make sure that air can flow freely to keep fungus at bay, and stay away from areas that are low and wet, because beauty berry doesn’t like wet feet.
Step 2: Prepare Loose, Well-Draining Soil
Preparing the soil is important for any shrub, and beautyberry is no different. I’ve learned that a little work here goes a long way. This plant isn’t picky, but it does best in soil that is slightly acidic to neutral, with a pH of 5.5 to 7.0. I always add compost or aged manure to the planting hole in my yard, which has a lot of clay, to help with drainage and add nutrients. If your soil is hard, dig a hole that is twice as wide and deep as the root ball. Then add some sand or perlite. Beauty berry can grow in regular garden dirt, but adding organic matter to it helps the roots grow faster. When I’ve rushed to plant, I’ve skipped this step once or twice, and those shrubs took longer to settle in. Now I do it every time. If you’re not sure, test your soil. A simple kit from the local nursery works great.
Step 3: Selecting Healthy Beautyberry Plants or Cuttings
Choosing the right starting material is the key to a healthy beauty berry. When I go to the nursery, I look for plants that are healthy, have strong stems, bright green leaves, and no signs of yellowing or bugs. Choose shrubs that are 1 to 2 feet tall and grown in containers. They are easier to move than those that are bare-root. If you want to grow more beautyberry plants from cuttings, which I do a lot to grow my collection, pick semi-hardwood stems from established plants in late summer. I have found that types like American beautyberry are easy to find and work well for beginners. Don’t buy plants that are wilted or have roots that are stuck in the pot. If the roots are circling the pot, gently tease them. In my experience, starting with quality stock means fewer headaches down the line, and your beauty berry will reward you with those stunning clusters sooner.
Step 4: Planting at the Correct Depth and Spacing
After you’ve prepared your plant and site, it’s time to put it in the ground. I’ve found that the best time to plant beautyberry is in the spring or fall, when the weather is cooler. Place the shrub so that the top of the root ball is level with the ground. If you bury it too deep, it could rot. Fill in the hole with your amended soil, making sure to press it down gently around the roots to get rid of air pockets. If you’re planting more than one beauty berry, space them out by 4 to 6 feet. This will give them room to grow without being too close to each other. Once, I planted them too close together in my garden, and they fought for light, which made the berries less plentiful. After planting, water the area well to settle the soil. Then, cover it with 2 to 3 inches of mulch, like pine bark, to keep the soil moist and keep weeds from growing. This easy step will help your new beautyberry grow strong.
Step 5: Watering for Root Establishment
Watering is very important in the beginning. I’ve seen beauty berry plants come back to life after being neglected, but they settle in better with regular moisture. Water deeply every three to four days for the first few weeks after planting. Each time, try to give the plants about an inch of water to help their roots grow deep. Use a soaker hose to keep the leaves dry, which can keep diseases from spreading. Once the shrub is well-established, usually by the second season, it can handle drought well and only needs water during long dry spells. I mulch a lot in my hot climate to keep the soil moist, and I’ve seen that too much water can cause root problems, so it’s better to be on the dry side. If the soil is wet a few inches down, wait. Watering it correctly lays the groundwork for a strong beautyberry that needs little care to grow.
Step 6: Feeding and Fertilizing for Healthy Growth
It doesn’t take much to feed your beauty berry, but a little extra help goes a long way toward healthy growth and lots of berries. I use a balanced, slow-release granular fertilizer like 10-10-10 in early spring. I spread it around the drip line and water it in. Don’t use formulas with a lot of nitrogen because they make leaves grow more than berries. I’ve tried using organic things like compost tea or fish emulsion in the middle of summer in my garden to give it a little extra boost, especially in soils that aren’t very good. You don’t need to feed beautyberry a lot; once or twice a year is enough. If you give it too much, the stems can become weak. If your soil is good, this shrub is usually forgiving, but keep an eye out for signs like pale leaves that could mean it needs more nutrients.
Step 7: Pruning and Shaping the Shrub
I’ve found that late winter or early spring, before new growth starts, is the best time to prune beautyberry. This keeps it looking neat and encourages more berries to grow. Cut back about a third of the oldest stems to the ground to encourage new growth. The berries grow on new wood. Use sharp shears to make clean cuts, and you can shape it into a round shape if you want. I usually let mine grow naturally to give it a wild look. One year, I didn’t prune my shrub, and it grew long and leggy and had fewer berries. Now, I do it every year. You can cut back any dead or crossing branches at any time. You can also cut the whole plant back hard every few years to make it new again. Beauty berry responds well and bounces back strongly.
Step 8: Managing Pests, Diseases, and Berry Drop Issues
Beautyberry is pretty tough, but problems can come up. If you deal with them right away, you can keep things under control. In hot weather, pests like aphids or spider mites might show up. I’ve used a strong hose spray or insecticidal soap to get rid of them when I needed to. Fungal diseases like leaf spot do well in humid conditions, so make sure there is enough space for air to flow. Remove affected leaves right away. Stress, like drought or too much fertilizer, can cause berry drop, but in my experience, regular care stops most of it. I put up netting around young plants until they are established because deer sometimes nibble on them. In general, beauty berry plants don’t need a lot of help; they naturally fight off problems.

Step 9: Long-Term Beautyberry Care and Maintenance
Beautyberry gives you years of beauty for steady, simple care over the long term. To keep the soil healthy, mulch it once a year. If the clumps get too big, split them up every five to seven years. In colder areas, I’ve added winter mulch to protect the roots. Keep an eye out for invasive behavior in some areas, but for the most part, it behaves well. As my shrubs have grown, they’ve become even easier to care for. They even drop seeds on their own, giving me free plants. Change up your care routine with the seasons, and your beauty berry will always put on a stunning fall display, which will also improve the ecosystem in your garden.
Best Beautyberry Varieties
Over the years, I’ve grown a number of different types of beautyberry, each with its own style. The American beautyberry (Callicarpa americana) is a classic plant with those famous metallic purple berries and a native feel. It’s great for gardens that attract wildlife. Try Pearl Glam for something a little different. It has dark purple leaves and bright white berries that look great together. Issai is a small Japanese type that grows a lot of pinkish-purple fruit. It’s great for small spaces. Profusion has heavy clusters of violet berries on arching branches, so if you want a lot of color, this is the plant for you. They all have the same easy-care trait, but each one is a little different in size and berry color.
Beginner Mistakes to Avoid
I’ve made a lot of mistakes when I first started, so I can tell you what to watch out for with beautyberry and how to avoid them. One big mistake is planting in too much shade. I’ve done it, and the berries were few and the stems were long. Always try to get sun. If you water new plants too much, their roots will rot. Let the soil dry out between waterings. It might seem easier to skip pruning, but it leads to too many plants and fewer fruits. Do it every year. Using the wrong fertilizer, like ones with a lot of nitrogen, can push leaves over berries. Finally, not paying attention to how well the soil drains in heavy clay can slow growth. Add a lot of it. If you learn from my mistakes, your beauty berry will do well from the start.
Landscaping Ideas and Garden Design Tips
Beautyberry is great for landscaping, and I’ve used it in my yard in ways that make it look its best. Put it along paths as a border shrub. The berries in the fall will make a bright edge. For a loose screen that attracts birds, space hedges 4 feet apart. In wildlife gardens, plant beauty berry with native plants like coneflowers or asters to make a place for pollinators to live. I’ve used it as a backdrop for spring bulbs or mixed it into perennial beds with ornamental grasses to make the texture stand out. It blends in perfectly with trees in wooded areas, adding interest to the understory. No matter what your style is, beautyberry’s relaxed shape works well in both casual and formal settings. It adds seasonal drama without being too much.
Expert Tips for More Berries and Fuller Growth
Based on my own tests, there are a few things you can do to make your beautyberry bushier and produce more berries. For better pollination, plant in groups. I’ve seen that shrubs that are alone make fewer fruits than those that are in groups. To make the soil a little more acidic, put pine needles on top of it. Beauty berry loves this for fuller growth. In the spring, pinch back the ends of the branches to make them branch out more. This will make more stems and berries. Don’t prune in late summer because it takes away wood that makes berries. To make your plants even more colorful, plant flowers that attract bees nearby to help with pollination. And here’s a personal favorite: pick berries for crafts, but leave a lot for birds. This keeps the ecosystem going and your shrub healthy.
Propagation Methods (Cuttings + Seeds)
It’s easy to propagate beautyberry, and I’ve done both methods successfully. It’s a great way to get more plants . In late summer, choose stems that are 4 to 6 inches long and have a few leaves. Put rooting hormone on the cut end, plant it in a mix of sand and peat, and keep it wet in indirect light. Roots will grow in 4 to 6 weeks, and then you can move them. To get seeds, pick ripe berries in the fall, mash them up to get the seeds, and then clean off the pulp. Put the seeds in moist sand in the fridge for 2 to 3 months to mimic winter, then plant them in pots in the spring. It takes 1 to 2 months for seeds to sprout. Thin out the seedlings and let them grow. Both methods produce strong plants, but cuttings are faster for making exact copies.
In conclusion, beautyberry is one of those easy-to-care-for shrubs that gives you a lot of benefits: it adds color, attracts wildlife, and stays interesting all year with little work. Beauty berry is a great way to improve your garden without a lot of work. It will quickly become a favorite, just like it has in mine.
FAQs –
1. What sets beautyberry berries apart from other shrubs?
The berries on a beautyberry shrub are very noticeable because they are a deep, almost metallic purple color that grows in tight clusters along the branches. This makes a big difference in the fall landscape. These berries are different from most because they look like jewels and stay that way even after the leaves fall off, making them interesting in the winter. They’ve survived light frosts in my garden, and they attract birds when food is hard to find. They are also mildly toxic to people but safe for animals, which makes them even more eco-friendly. If not eaten in large amounts, they don’t pose a risk to pets or kids.
2. Can you grow beauty berry in pots for small spaces?
Yes, beauty berry grows well in pots, which is great for patios or balconies where there isn’t a lot of room. Pick a big pot that is at least 18 inches wide and has good drainage. Use a good potting mix that has been mixed with compost. This is how I’ve grown compact types like Issai, trimming them to keep them at a height of 3 to 4 feet. Water more frequently than in-ground plants, especially in summer, and overwinter indoors in colder zones. It still makes a lot of berries, which makes it a good choice for city gardeners.
3. What should I do about the yellowing leaves on my beautyberry?
If the leaves on your beautyberry are turning yellow, it could mean that you’re watering it too much, that it doesn’t get enough nutrients, or that the water isn’t draining properly. I’ve had these problems with my plants. First, check the moisture level in the soil. If it’s too wet, stop watering it and add things to make the drainage better. A soil test might show that there isn’t enough iron or nitrogen in the soil. In the spring, use a balanced fertilizer. In my experience, pests like aphids can also cause this. Check the undersides and treat them with neem oil. Prune the parts that are affected to let air flow better. As the weather gets better, your shrub should start to grow green again.
4. Does beautyberry take over in some areas?
Beautyberry is usually well-behaved, but some types, like the Japanese variety, can self-seed a lot in warmer climates and could become invasive if not kept in check. In my area, I’ve seen it spread a little bit when birds drop seeds, but it’s easy to keep under control by pulling up seedlings early. Check the rules in your area, as it is native and helpful in many parts of the U.S. To avoid problems, either pick sterile hybrids or deadhead spent berries before they fall. In general, it’s not as aggressive as privet and other plants.
5. What other plants go well with beauty berry in a garden bed?
Beauty berry looks great with fall-blooming perennials like sedum or asters, which have colors that are similar to the berries and make the display last longer. I’ve planted it next to ornamental grasses to give it a different texture, or next to boxwood to give it structure all year long. Black-eyed Susans and other native wildflowers attract the same pollinators, which makes the habitat work well together. Hostas or ferns look good with its arching shape in the shade. The key is to mix heights and colors to create a layered look that draws attention to the beautyberry’s berries.
6. How long does it take for a beautyberry plant to make berries?
Once a beautyberry plant is established and has grown enough wood, it usually starts making berries in its second or third year. In my garden, container plants usually start to bear fruit sooner than seeds, often by the second year with good care. Sunlight and pollination speed things up—plant in the sun and close to other plants that bees like. Be patient. Focus on the roots first, and the clusters will show up as the shrub grows.
7. Is there anything else I can do with beautyberry berries besides decorate?
Beautyberry berries have more than just decorative uses. For example, I’ve crushed leaves to make a bug spray because they have chemicals that keep mosquitoes away. People can’t eat the berries, but they can be used to make dyes for crafts that give fabrics a soft purple color. In terms of wildlife, they are food for birds and small mammals. Always be careful when handling them, as they can stain your hands or clothes while you pick them.
8. How do you best keep beauty berry alive in zone 5 during the winter?
In zone 5, where winters can be very cold, beautyberry needs to be mulched with 4 to 6 inches of straw or leaves to keep its roots warm. I’ve wrapped young bushes in burlap to protect them from windburn, especially if they are out in the open. In the fall, don’t prune too much so you don’t stress the plant. Also, make sure to water it well before the ground freezes. Established plants are tough, but if you want more, grow them inside. To harden off, take off the protections slowly in the spring.