In This Article
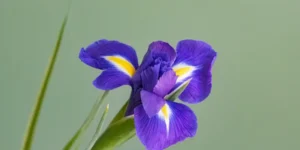
Hey there, fellow garden lovers! If you’ve ever strolled through a spring garden and been stopped in your tracks by those tall, elegant flowers with petals that look like they’re wearing fuzzy beards, you’re probably thinking of bearded iris . These beauties have been a staple in my garden for over 20 years, and let me tell you, there’s nothing quite like watching them burst into color after a long winter.
In this bearded iris care guide, I’ll walk you through everything you need to know to grow these stunning perennials. Whether you’re a newbie dipping your toes into gardening or a seasoned pro looking to up your game, you’ll find practical tips that make a real difference. Growing bearded iris isn’t just about pretty flowers—it’s about creating a low-maintenance showstopper that comes back stronger each year, adding value to your yard and even attracting pollinators like bees and butterflies.
Stick with me, and by the end, you’ll have the confidence to plant, maintain, and enjoy your own bearded iris patch. Let’s dig in!
| Aspect | Details |
|---|---|
| Common Name | Bearded Iris |
| Botanical Name | Iris germanica |
| Family | Iridaceae (Iris family) |
| Plant Type | Herbaceous perennial |
| Mature Size | 1–3 feet tall, 1–2 feet wide |
| Growth Rate | Moderate |
| Sun Exposure | Full sun (6–8+ hours daily) |
| Soil Type | Well-draining, sandy or loamy soil |
| Soil pH | Slightly acidic to neutral (6.0–7.0) |
| Watering Needs | Low to moderate; allow soil to dry between watering |
| Drought Tolerance | High once established |
| Humidity | Normal outdoor humidity |
| Temperature | 55–75°F (13–24°C) ideal |
| Fertilizer | Low nitrogen fertilizer early spring & after bloom |
| Bloom Time | Spring to early summer |
| Flower Colors | Purple, white, yellow, pink, blue, bi-color |
| Fragrance | Some varieties lightly fragrant |
| Leaf Type | Sword-shaped, upright green foliage |
| Planting Depth | Rhizome top slightly exposed above soil |
| Spacing | 12–18 inches apart |
| Pruning | Remove spent blooms & dead leaves |
| Propagation | Rhizome division (every 3–4 years) |
| Hardiness Zones | 3–9 (USDA) |
| Native Area | Europe (widely cultivated worldwide) |
| Indoor/Outdoor | Outdoor garden plant |
| Toxicity | Mildly toxic if ingested (pets & humans) |
| Common Problems | No blooms, rot, overcrowding, leaf spot, borers |
| Care Level | Easy (beginner friendly) |
| Best Uses | Borders, beds, landscaping, cottage gardens |
What is Bearded Iris

Bearded irises, technically Iris germanica, are a striking group of flowering perennials, distinguished by the distinctive “beard” on their lower petals. These aren’t your run-of-the-mill irises; they’re the tall, flamboyant ones that demand attention in gardens.
Native to Europe and Asia, bearded irises have been cultivated into thousands of different varieties, showcasing a spectrum of colors, from rich purples to vibrant yellows. They propagate from rhizomes, those robust, fleshy roots that extend beneath the soil.
Each iris flower presents a trio of upright petals, known as standards, alongside three that gracefully droop, the falls. The distinctive beard, a fuzzy feature, serves as a kind of welcome mat for visiting pollinators.
Why are they so appealing to those who tend to them? Once they’re settled in, they’re remarkably resilient. They’re also drought-resistant and, generally, not a favorite of deer. I’ve watched them flourish in places where other plants struggled, which makes them a reliable choice for gardeners seeking bold visual impact without a lot of ongoing maintenance.
Why Grow Bearded Iris
Why even consider bearded iris care, given the vast array of flowers available? Well, for one thing, they’re immensely gratifying. Personally, I find nothing quite compares to the excitement of those initial buds unfurling in late spring, releasing a delicate, sweet perfume.
They’re also adaptable, thriving in cutting gardens, rockeries, and even pots if you’re pressed for room. And, they have a knack for multiplying, meaning a single plant can eventually become a sprawling colony, which is a nice way to save some cash on future purchases.
From a practical perspective, bearded irises do wonders for the soil. Their root systems help keep the earth in place, and they offer a home to helpful insects.
Plus, they bring a certain something. Picture your garden bursting with color just as spring arrives. If you appreciate beauty without a lot of fuss, figuring out how to grow bearded irises is a good idea; the rewards are considerable for the effort involved.
Planting Guide
Ready to roll up your sleeves? Planting bearded irises is simple enough, though the when and how are key. Late summer or early fall is ideal, right after they’ve finished their show. This gives them a chance to settle in before the cold sets in.
Start by picking a sunny location with excellent drainage; standing water is a death sentence. Dig a shallow hole, roughly 10-12 inches wide and about 4 inches deep. Position the rhizome horizontally, with just a light dusting of soil over the top. Picture it like planting a potato, but not quite as deep.
Space them a foot to two feet apart, giving them room to spread. Water the plants lightly once they’re in the ground to help the soil settle, but don’t drown them. I usually put a thin layer of gravel mulch around mine to keep weeds at bay and help with drainage. If you’re just starting out, get healthy rhizomes from a good nursery; steer clear of any that feel squishy or soft.
Spring planting is doable, but it’s a gamble; fall is generally better. Stick to these guidelines, and you’ll be off to a good start with your iris plants.
Soil Requirements
Soil is the bedrock of thriving bearded irises. These beauties flourish in well-draining, slightly alkaline soil, ideally with a pH hovering between 6.8 and 7.0. If, like my garden, you’re dealing with heavy clay, you’ll need to amend it. Sand or compost will work wonders to break it up.
Steer clear of overly rich, manure-laden soils; they’re a recipe for rot. Instead, strive for a gritty blend that allows water to flow freely. A simple soil pH test kit from the store will do the trick. If your soil leans too acidic, a dose of lime will bring it into the desired range.
For pots, a cactus mix combined with perlite is a good choice. And don’t forget: bearded irises despise sitting in water. Raised beds are a godsend in wetter climates. Proper soil preparation translates to healthier plants and, ultimately, more impressive blooms.
Sunlight Needs
Sunlight is absolutely essential for bearded iris plants. These beauties require a minimum of 6-8 hours of direct sunlight each day to truly flourish and produce a generous display of blooms. In hotter regions, morning sun coupled with afternoon shade can be a good compromise, but too much shade results in weak, floppy stems and a less impressive flowering show.
From my own experience, I’ve seen that plants in partial shade tend to stretch upwards, but their blooms are less than spectacular. It’s best to place them where they can soak up that precious morning light—south-facing areas are perfect. If you live in a city with buildings casting shadows, take the time to observe your garden’s light patterns throughout the day before you plant.
Sufficient sunlight also plays a role in preventing fungal problems by allowing the foliage to dry out quickly. When it comes to successfully growing bearded iris, sunlight is your most valuable ally.
Watering Schedule
Watering is key to keeping your irises thriving. While bearded irises are pretty good at handling dry spells once they’re settled in, they do need regular watering during their first year. Aim to give them a deep drink once a week, about an inch of water, particularly when it’s dry.
After they’ve finished blooming, cut back to watering every 10 to 14 days; too much water can lead to rot.
A simple trick: Stick your finger into the soil; if it’s dry down to two inches, it’s time to water.
Mulching is a great way to keep moisture in without making things too wet. From what I’ve seen, watering in the morning helps reduce evaporation and the risk of disease. Adjust your watering routine based on your local climate, and your plants will be much happier and healthier.
Fertilizer Plan
Fertilizing is essential for healthy bearded irises, but the adage “less is more” definitely applies. A low-nitrogen fertilizer, such as 6-10-10, is best, applied in early spring when growth begins, and then again after the blooms have faded, to encourage next year’s display.
Use it sparingly—roughly a tablespoon per plant, worked into the soil. Steer clear of fertilizers high in nitrogen; they tend to favor foliage at the expense of flowers. Bone meal is a good natural source of phosphorus, which helps develop strong roots.
Don’t fertilize in the fall; this allows the plants to prepare for winter. I’ve noticed that over-fertilizing can result in soft, vulnerable growth that attracts pests. Follow this regimen, and your bearded irises should reward you with a spectacular show of color.
Seasonal Care Calendar
Bearded iris care changes with the seasons. Here’s a handy table to keep you on track:
| Season | Tasks | Tips |
|---|---|---|
| Spring (March-May) | Remove winter mulch, divide if crowded, fertilize lightly. Watch for new growth. | Check for pests early; mulch lightly to suppress weeds. |
| Summer (June-August) | Deadhead spent blooms, water during dry periods, divide after flowering. | Provide shade cloth in extreme heat to prevent scorching. |
| Fall (September-November) | Plant new rhizomes, cut back foliage to 6 inches, apply mulch for winter protection. | Ensure good drainage to avoid rot over winter. |
| Winter (December-February) | Minimal care; protect from heavy snow if needed. | Avoid walking on frozen beds; inspect for heaving rhizomes. |
Best Bearded Iris Varieties
Selecting the right varieties is key to successful bearded iris cultivation. For those just starting out, consider ‘Immortality.’ This rebloomer showcases pristine white flowers that reappear in the fall.
‘Beverly Sills’ presents coral-pink blooms with ruffled edges, and it’s both fragrant and robust. If you’re after something a bit more striking, ‘Dusky Challenger’ boasts deep purple petals that can appear nearly black in the shade.
Dwarf bearded irises, such as ‘What Again,’ are perfect for smaller spaces, offering both compactness and vibrant color. I’ve personally grown ‘Stairway to Heaven’ for its stunning blue-and-white contrast—it’s a real standout. When choosing, think about your color preferences and climate zone; most varieties are hardy in zones 3 through 9.
Propagation Methods
Propagation is key to expanding your bearded iris garden. The simplest method? Division, ideally every three to four years, and late summer is the perfect time.
To do this, uproot the clump, slice the rhizomes into pieces, ensuring each has a fan of leaves, and then replant them. Toss out any old, woody centers. Think of it as a reset, a way to avoid overcrowding.
Seeds present a more complex challenge for growing bearded iris. Gather them from the pods in the fall, give them a three-month cold treatment in the fridge, and then plant them in the spring. Germination can be slow, and hybrids might not resemble their parents.
I favor division for dependable results. But if you’re patient, seeds can produce novel varieties—great for those who enjoy experimenting.
Common Problems and Fixes
Bearded irises are tough, but issues arise. Here’s a troubleshooting table:
| Problem | Symptoms | Fixes | Prevention |
|---|---|---|---|
| Iris Borer | Holes in leaves, mushy rhizomes | Remove affected parts, apply beneficial nematodes | Clean up debris in fall, rotate plants |
| Bacterial Soft Rot | Foul-smelling, soft rhizomes | Cut out rot, treat with bleach solution, replant in fresh soil | Ensure good drainage, avoid overcrowding |
| Leaf Spot | Brown spots on foliage | Fungicide spray, remove infected leaves | Space plants for air flow, water at base |
| Aphids | Sticky residue, curled leaves | Insecticidal soap or ladybugs | Encourage natural predators, monitor early |
| No Blooms | Healthy foliage but no flowers | Check sun exposure, divide if crowded, fertilize properly | Plant in full sun, avoid excess nitrogen |
Beginner Mistakes to Avoid
As a newbie, I made plenty of errors in bearded iris care. Here’s a list to save you trouble:
- Planting too deep: Rhizomes need sun on their backs—bury them shallow.
- Overwatering: Don’t give water to many time ; let soil dry then give .
- Ignoring division: Crowded clumps stop blooming; divide every few years.
- Wrong fertilizer: High nitrogen means all leaves, no flowers.
- Poor site choice: Shade or soggy soil spells failure.
- Skipping cleanup: Debris harbors pests; tidy up in fall.
- Buying bargain rhizomes: Cheap ones often carry diseases.
- Planting in spring only: Fall is better for root establishment.
- Forgetting mulch: Helps with weeds and moisture.
- Expecting instant results: Patience is key—they improve with age.
Avoid these, and your bearded iris planting will succeed from the start.
Landscaping Ideas
Bearded irises brighten up any garden. Combine them with peonies or daylilies, and you’ll have a continuous display of flowers along your borders.
Their sword-shaped leaves bring a welcome texture to rock gardens. I’ve planted them along walkways, where their height immediately catches the eye. For a more traditional look, try mixing different colors for a vibrant effect.
Consider mass plantings for a bold statement, or mix them with grasses for a more contemporary feel. In smaller areas, pots are a good option, provided they drain properly. They’re also useful for edging vegetable beds, as they can help keep some pests away.
The possibilities are endless; bearded iris care can be easily incorporated into any garden design.
Expert Tips for Bigger Blooms
Want monster blooms? Here’s my pro tips from years of bearded iris care:
- Hill them up: Mound soil slightly under rhizomes for better drainage.
- Companion planting: Grow with lavender to repel pests and enhance fragrance.
- Deadhead religiously: Removes spent flowers to redirect energy.
- Use Epsom salts: A sprinkle in spring boosts magnesium for richer colors.
- Rotate beds: Every 5 years to prevent soil depletion.
- Protect from wind: Stake tall varieties in exposed areas.
- Experiment with hybrids: Cross-pollinate for custom colors—it’s addictive!
- Monitor pH annually: Keeps nutrients available.
- Add grit: Mix in crushed stone for ultra-drainage in clay.
- Celebrate rebloomers: Varieties like ‘Immortality’ give two shows.
These hacks have turned my average patch into a neighborhood envy.

FAQs
1. What is the best time for bearded iris planting?
Late summer or early fall is the sweet spot for planting bearded irises. This timing allows the roots to settle in before the cold sets in, which translates to a more robust display come spring.
2. How often should I water my bearded iris?
Water newly planted bearded irises once a week until they’re settled in. Established plants, however, are more forgiving. They’ll only need watering during dry periods, roughly every 10 to 14 days, depending on how much rain has fallen.
3. Why aren’t my bearded irises blooming?
Shade, crowding, or an overabundance of nitrogen are frequent culprits. Make sure your plants get at least six hours of sunlight daily, divide them every three to four years, and stick to balanced fertilizers.
4. Can bearded iris grow in pots?
Yes, but use well-draining soil and large containers. Overwinter indoors in cold zones to protect rhizomes.
5. How do I divide bearded iris?
Dig up clumps in late summer, cut rhizomes into sections with leaves, and replant shallowly. Discard old parts to rejuvenate the plant.
6. What soil pH is best for iris plant care?
Aim for 6.8-7.0, slightly alkaline. Test and amend with lime if needed for optimal nutrient uptake.
7. What’s the lifespan of a bearded iris plant?
With proper care, they can live 10-20 years, multiplying over time for a fuller display.
Conclusion
Having reached the end of this bearded iris care guide, I trust you’re considering welcoming these beauties into your own garden. Their delightful flowers and straightforward upkeep have solidified their status as perennial favorites.
Keep in mind, the key to success lies in the fundamentals: sunlight, proper drainage, and consistent care. Don’t hesitate to experiment, learn from any missteps, and savor the experience—just as I have for many years. Your garden will reward you with a breathtaking display each spring.
Happy gardening! If you decide to put these tips into practice, please leave a comment; I’d be eager to hear about your experiences with bearded irises.