In This Article
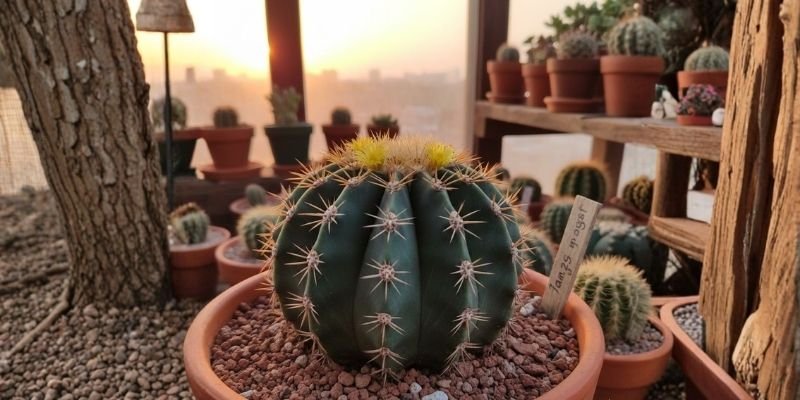
Hey there, plant enthusiasts! You’ve likely seen those charming, almost spherical cacti at your neighborhood garden store – the ones that seem like they could drift away. That’s the ball cactus, or balloon cactus, and it’s a hit with everyone, from those just starting out to experienced gardeners. Native to South America, this little beauty thrives in the dry, rocky terrains of Brazil and Argentina. But what is it about the ball cactus that makes it such a popular choice for bringing a bit of the desert indoors?
Having spent more than fifteen years caring for desert plants in all sorts of conditions, I can tell you it’s the ease of care that really wins you over.
These plants are easy to care for, but they reward your attention with a living work of art, right on your windowsill. And the flowers! Those brilliant yellow or pink blooms that top the plant are truly something to see. If you’re just starting with succulents or looking to add to your collection, the balloon cactus is a great choice. It’s easy to look after and a joy to have, perfect for apartments, offices, and even outdoor patios in temperate areas.
To give you a quick overview before we dive into the care details, here’s a handy table summarizing the key info on the ball cactus:
Field | Details |
Botanical Name | Parodia magnifica (formerly Notocactus magnificus) |
Common Names | Ball cactus, balloon cactus |
Plant Type | Succulent cactus |
Mature Size | 6-12 inches in diameter, up to 8 inches tall |
Growth Habit | Globular, spherical shape with vertical ribs and fine spines |
Light Requirement | Bright, direct sunlight; at least 6 hours daily |
Soil Type | Well-draining cactus mix or sandy loam |
Water Needs | Low; water sparingly, allowing soil to dry completely between waterings |
Maintenance Level | Low; beginner-friendly with occasional checks |
How to Care for Ball Cactus

Caring for a ball cactus? It’s not exactly brain surgery. Think of it more as tending to a resilient little plant, perfectly at home in a desert’s embrace. I’ve cultivated countless of these spherical wonders in both my house and greenhouse, and I’ve discovered that a simple, consistent approach is the key to their well-being. So, let’s go through the entire care regimen, step by step, as if we’re doing it together, right now.
Step 1: Choose the Right Location
The initial advice I offer to anyone new to caring for a plant is to consider its living arrangements. Given that ball cacti are native to bright, arid regions, replicating those conditions is essential. Personally, I find a south-facing windowsill indoors to be ideal for my balloon cactus. It provides ample natural light, while also shielding the plant from chilly drafts.
If you’re cultivating a ball cactus outdoors, as I do in my summer garden, choose a spot that’s somewhat protected and well-ventilated. A patio overhang works well, offering shelter from torrential downpours. Steer clear of dark, dank corners or bathrooms; this cactus prefers bright, open spaces. Based on what I’ve seen, getting the location right from the beginning helps the plant acclimate without any fuss, ensuring that signature round shape remains full and lively.
Step 2: Provide Proper Light
Light is essential for any cactus, and the balloon cactus is no different. I’ve discovered that providing it with a minimum of six hours of direct sunlight daily keeps it healthy and prevents it from becoming elongated and misshapen, a condition known as etiolation. Within my indoor arrangement, I rotate my ball cactus every few weeks. This ensures that all sides receive equal exposure to the light; otherwise, it could start to lean toward the light source.
If your home lacks sufficient natural light, particularly during the winter months, I’ve found grow lights to be incredibly effective. A full-spectrum LED bulb, positioned roughly a foot away and left on for ten to twelve hours, replicates the desert sun remarkably well. When the weather warms up, I occasionally offer my balloon cactus some afternoon shade to prevent sunburn. Believe me, once your cactus starts to develop that beautiful golden hue from the right lighting, you’ll be treated to those rare blooms that truly justify the work.
Step 3: Use the Correct Soil Mix
Soil can be a stumbling block for those new to cacti, but it’s really not that complicated once you get the hang of it. For my ball cacti, I make my own soil mix to guarantee quick drainage. I use equal parts potting soil, coarse sand, and perlite. This keeps water from pooling around the roots, which is a surefire way to kill these plants. Pre-packaged cactus mixes are perfectly acceptable as well, though I often toss in some pumice for added aeration.
When I repot a new balloon cactus, I always start by carefully removing the old soil and examining the roots. Through plenty of practice, I’ve discovered that using heavy, moisture-retaining garden soil is a recipe for disaster; it causes rot quicker than you can blink. Choosing the right soil is key to ensuring your ball cactus establishes a deep, stable root system that lasts for years.
Step 4: Potting the Ball Cactus Correctly
Potting a balloon cactus might look easy, but doing it properly is key to its well-being. I usually begin with a terracotta pot, one that’s only a couple of inches larger in diameter than the cactus itself; a pot that’s too big will keep the soil too moist. Next, I add a layer of gravel at the bottom to aid drainage, then fill the pot halfway with my soil blend. I position the cactus in the center, keeping it upright as I backfill with soil, pressing lightly to remove any air pockets.
I always don gloves; those tiny spines are surprisingly deceptive. After repotting, I give them a week to recover from any root disturbance before watering. Outside, I group several together in shallow trays, creating a miniature desert scene. Inside, though, I keep things simple with one cactus per pot. This approach has kept my plants healthy and happy, avoiding any transplant shock.
Step 5: Watering the Right Way
Watering is absolutely critical for keeping a ball cactus healthy, and I’ve certainly learned the hard way about overwatering. The key is simple: water thoroughly, but not often. Wait until the top couple of inches of soil are completely dry. I rely on the finger test: poke your finger in, and if the soil feels dry, give it a good drink until water drains out the bottom, then dump any excess from the saucer.
During the summer, I might water my indoor balloon cactus every fortnight. Come winter, I dial it back to once a month, or even less frequently, depending on how humid it is. When it’s outside, the rain can help out, but I still poke around in the soil to make sure. Misting is a no-go; these guys thrive in dry air. From what I’ve seen, it’s better to err on the side of underwatering. A slightly shriveled ball cactus will usually recover, but roots that sit in water turn to mush, and that’s a recipe for disaster.
Step 6: Feeding During Active Growth
Fertilizing a balloon cactus isn’t a year-round commitment; it’s all about the right moment. I give mine a boost during the active growth period, which runs from spring through early fall. I use a diluted cactus fertilizer, at half strength, every four to six weeks. Look for one that’s high in potassium; it really helps with the blooming. In my greenhouse, I’ve seen that too much fertilizer results in soft, unnatural growth, so I play it safe. Don’t fertilize at all during the winter months when the plant is dormant. For outdoor ball cacti, a slow-release granular fertilizer is the way to go, sprinkled around the base in the spring. This method has consistently helped my balloon cacti produce those beautiful flowers, transforming a simple sphere into a floral spectacle.
Step 7: Managing Temperature and Humidity
Temperature and humidity can be a sneaky pair if you’re not paying attention. The ball cactus thrives in warmth, ideally between 70-90°F during the day, and dropping to 50-60°F at night, a reflection of its natural environment. I’ve found that keeping mine indoors, near a sunny window during the winter, away from heaters that can dry the air too much, works best. Outside, in zones 9-11, it’s perfectly happy year-round, but I bring mine in when the temperature falls below 50°F to prevent any cold damage. As for humidity, keep it on the low side; excessive moisture can lead to fungus problems. In humid climates, I use a fan to keep the air circulating. From my experience, maintaining this balance prevents issues like scarring or slow growth, ensuring your balloon cactus stays looking its best.
Step 8: Preventing Pests and Rot
Pests and rot are the constant enemies of cactus enthusiasts, but a watchful eye can keep them under control. I’ve battled mealybugs on my ball cactus—those telltale white, fuzzy patches—and I deal with them by applying alcohol with a cotton swab. Spider mites tend to appear in dry environments, so a light spray with a hose outside or insecticidal soap inside usually does the job. Rot, on the other hand, often stems from overwatering; if you see soft, black spots, trim away the affected areas with a sterile knife and allow the cut to callus before replanting in dry soil. Prevention is the best defense: ensure good airflow and avoid letting water pool on the crown. In my outdoor arrangements, I keep an eye out for snails, employing barriers like copper tape. Staying ahead of the game has saved many a balloon cactus in my collection.

Step 9: Long-Term Care and Growth Tips
A ball cactus is a long-term commitment, often thriving for decades with little attention. I repot mine every couple of years, or when it gets too big for its pot, always in the spring. Pruning isn’t necessary, but if it develops pups at the base, I carefully twist them off to propagate. Just plant them in damp sand until they root. To coax blooms, give it a cool, dry winter dormancy. From what I’ve seen, keeping balloon cacti with other succulents makes for a low-water microgarden that’s simple to care for.
Keep an eye out for any signs of distress, such as changes in color, and make adjustments as needed. Over time, your ball cactus will become a beloved, constantly evolving presence.
To sum it up, the ball cactus, also known as the balloon cactus, is a remarkably easy plant to care for, provided you stick to these simple guidelines. It demands very little while bringing a lot of character to your surroundings, demonstrating that impressive plants don’t have to be high-maintenance.
FAQs –
1. Why is my ball cactus turning yellow?
Yellowing leaves can be a puzzler, no doubt. From what I’ve seen in my own plants, it’s frequently a case of either too much direct sunlight or problems with watering. If the leaves are getting fried, try moving the plant to a spot with filtered light, but do it slowly. Overwatering is the culprit behind root rot, which then causes those yellow spots. Let the soil dry out thoroughly and check for any mushy roots. I’ve managed to rescue a few plants by repotting them in fresh, dry soil and then holding off on watering for a couple of weeks.
2. How often should I repot my balloon cactus?
I usually repot every couple of years, or sooner if I see roots pushing through the drainage holes. Spring is ideal; the plant is primed for a growth spurt then. I always go with a pot that’s just a bit bigger and fresh soil to give it a nutrient boost. I remember one time I waited too long, and the ball cactus became root-bound, which really slowed down its growth. Lesson learned!
3. Can ball cactus survive outdoors year-round?
It really comes down to where you are. If you’re in a warm, dry place, say USDA zones 9 through 11, then sure, you can leave them outside. Just make sure to shield them from frost and heavy downpours. I’ve managed to keep mine alive through the winter, tucked under the eaves, but if you’re in a cooler climate, it’s best to bring them inside. A sudden cold snap once wiped out a young balloon cactus of mine, so it’s better to be safe than sorry.
4. What if my balloon cactus isn’t blooming?
Blooms often arrive with age and attentive husbandry, typically after a few seasons. Provide ample light and a winter rest, characterized by cooler temperatures and reduced watering. I give a light feeding in spring to encourage flowering. One of my older ball cacti, for example, blooms annually, displaying those bright yellow flowers.
5. Are ball cacti toxic to pets?
Fortunately, they’re harmless, though those spines could definitely jab at a curious cat or dog. I keep mine up high, out of reach. If they do get eaten, it could cause a bit of a stomach ache, but based on my own pets, they seem to learn pretty quickly to avoid them after a single poke.
6. How do I propagate a balloon cactus?
If offsets, or pups, show up, carefully twist them off once they’re a couple of inches long. Allow the cut end to dry out for a day or two before planting it in sandy soil. Keep it lightly moist until roots develop. That’s how I’ve expanded my collection, transforming a single ball cactus into a whole family.
7. What’s the best way to handle spines on a ball cactus?
Always wear thick gloves or use tongs; those tiny hairs can be a real nuisance. When you’re moving them, wrap them up in newspaper to get a better hold. I learned the hard way about balloon cacti; I got a rash once from touching one. Now, I handle them with care, like they’re something prickly.
8. Can I grow ball cactus from seed?
Indeed, it’s a slower process. Start with a cactus mix, maintain warmth, and keep the soil barely damp under plastic to encourage germination. The seedlings will resemble tiny balloon cacti after several months, but the payoff is significant. I’ve begun several batches in my greenhouse, and it’s gratifying to see their shapes develop as time passes.